With throwing in baseball a fundamental part of the game, having a selection of baseball throwing drills in your arsenal will do both your coaching and your players the world of good.
Along with the accuracy of the throw, the power and the technique of the throw are important areas you must consider in your throwing drills when coaching 5-12 year olds.
While the arm throws the ball, the entire body is needed in order to throw with accuracy and power and with all positions on the field requiring an ability to throw the ball it should at very least, take up a considerable amount time in your training sessions.
Below I listed several drills you can use in your next practice to help improve:
- Accuracy: Accuracy is important (obviously) but this comes from being able to throw the ball with proper form. The drills below will give you the perfect setup for your drills to help your little ones make less mistakes and errors in their throwing.
- Distance: Some throws will be short, some long. But as many MLB players will tell you, it’s important to train for both. Understanding proper throwing mechanics and being able to appropriately work these into your drills is of paramount importance for youth players.
- Injury Prevention: While injuries with younger kids is rare, the habits they pick up today will be the difference in performance they experience tomorrow. When using the drills below, ensuring you coach the correct mechanics will help your players for years to come
- Confidence: And this is probably the biggest benefit of throwing drills at a young age – especially for kids aged 5-7 years old. It’s simple, when kids learn how to throw properly and do so in an environment that is fun and engaging – this will increase their confidence not only in throwing but in all other areas of their game.
Overall, throwing development is really important at a young age if they are to have any sort of future success in the game.
Use the drills below and adapt them where needed to help you players throw better with more confidence.
Not In My Backyard

Setup: Split your players into 2 equal groups. One side in the infield and the other side in the outfield zones.
How To: Have Fun Throwing In ‘Controlled Chaos’
Place an equal amount of practice balls in each side.
Objective: On the coaches whistle the players on each side try to throw as many of the balls on their own side over to the opposite zone. The team with the least amount of balls in their zone when the coach blows the whistle to stop – is the winner.
Further Notes: This is a great ‘controlled chaos’ drill that all involved will love to play. Make sure you use practice balls for safety.
Throw & Catch
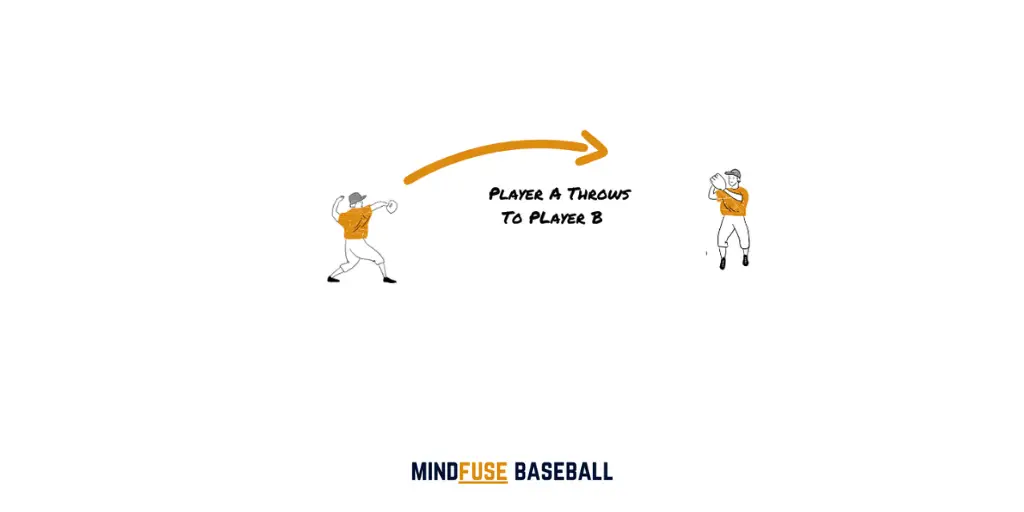
Simple drill here that’s also great for warm ups but better for really younger players when you’re trying to develop basic hand-eye coordination.
Setup: I think everyone knows this one, but make sure you have enough space and use the appropriate balls depending on the age group.
Objective: Again, pretty straight forward, but what you can do for slightly older age groups 7, 8, 9, 10, 11 and 12 year olds is progress into the next throwing drill…
Catch Chain
![Baseball Drills for Kids: Catch Chain [MindfuseBaseball.com]](https://mindfusebaseball.com/wp-content/uploads/2020/04/Baseball-Drills-for-Kids_-Catch-Chain.png)
While the name suggests catching – it’s simultaneously a great progressive, challenging drill.
How To: Progressively Develop Catch Chain
Setup: Set up in pairs, and place 3 cones on each side. Both players will start at the nearest cone and throw and catch the ball. Each next cone is place 2ft behind the last making the distance slightly longer than before. Of course, you can add more cones depending on the age group (9, 10, 11 and 12 year olds)
Objective: The goal is simple, in order to progress to the next furthest cone, both players must make a successful throw and catch. If you’re working with more than 2 players (4, 6, 8 or more players) you can play them off against each other, and the first pair to complete the full distances are the winners.
You can also vary the types of throws to progress or regress the drill.
One Knee Throw

This simple drill takes the lower body out of the frame so that your young players can focus on the arm technique only. This throwing drill lends really well to help you look for technique errors in their throwing arm without them having to focus on their feet.
How To: Perform The One Knee Drill
Setup: Get your players to kneeling on one knee. (Right handed throwers on right knee and vice versa for lefties).
Objective: This is where you can really dig into the technique of your players throws. Focus on their arms and make corrections where necessary. Start without throwing the ball. Progress into throwing the ball, and the further progress into a mini throwing drill game that measures the distances of your players throws. The next phase in the progression for this drill would be to introduce feet and body movement into the throw.
Water Bottle Throwing Drill

Staying on topic of overall throwing technique, this drill which involves using a water bottle is a great throwing drill that gives instant feedback to your players through the movement and weight distribution of the water in the bottle.
How To: Throw With The Water Bottle
Setup: Not much setup here other than a water bottle but for each position:
- Outfielders:
- Start by holding the water bottle upside down by the neck of the bottle
- Drive the elbow and arm back so the water stays at the top of the bottle
- Forearm should now be making an L shape
- Drive through and externally rotate so the water moves to the bottom of the bottle
- Make the throw and ensure you follow through
- Infielders & Catchers:
- Start with the elbow flexed and initiate the arm movement for the throw.
Objective: Here the focus is primarily on the technique of the throwers arm.
Further Notes: This drill can progress to using wrist weights, and of course a baseball.
Throwing Distance
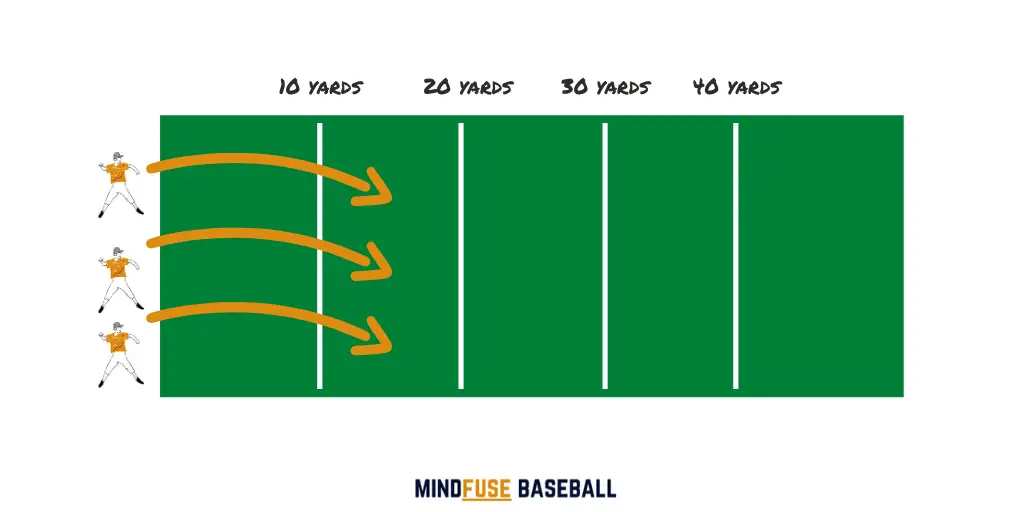
Throwing distance takes the technique coaching points you will have covered in the previous drills and pits them into a challenge-style drill to see who can throw the furthest.
Setup: Mark out a useable area of the field, a start throwing point and 5-7 distance points. Line your players up at the start point ready to throw.
Objective: Throw the ball with the furthest with the best technique as possible.
Ready Aim Throw
![Ready. Aim. Throw. Baseball Drill [MindFuseBaseball.com]](https://mindfusebaseball.com/wp-content/uploads/2020/04/Ready.-Aim.-Throw-Baseball-Drill.png)
This drill works on the accuracy and depending on the distance and target you use – possible power also.
How To: Throw With Accuracy, Distance & Power
Setup: Set up your targets. Now depending on the age group you may have a ball on a batting tee for older players (9 years old+) or you may decide to pin some hoops to a fence which would accommodate 5-8 year olds more. You could also, for 13 year olds+ add a bigger ball on the batting tee – and therefore not only working on accuracy but power also.
Objective: The goal is to knock the ball off the batting, or throw a ball through the hoops if working with younger players.
Triangle Target Throws
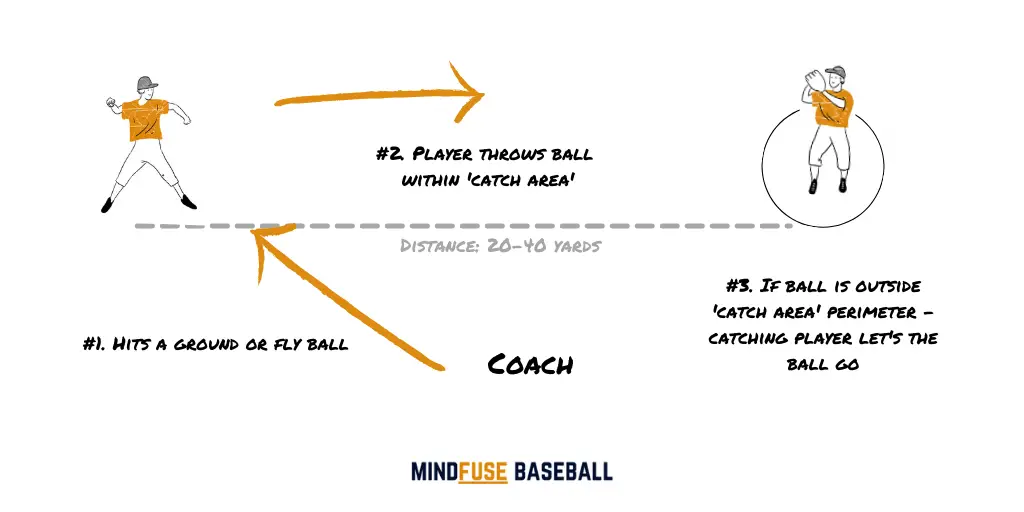
How To: Simulate Throwing From Real-Game Situations
Setup: You’ll want to set up 3 players in a triangle formation. The distance apart will depend on the age group and ability you’re working with. You’ll place one player as a feeder (or a coach feeding the ball), 1 players who catches AND throws and the ball and another player located in a target zone.
Objective: The coach or 3rd player hits a ground or fly ball to the 2nd player. That player must catch the ball and then make a throw to the 3rd player located in the zone. The 3rd player is not allowed to move outside the zone when catch the throw – therefore depending on the accuracy of the 2nd players throw.
And there you have it – feel free to adapt these baseball throwing drills to suit the needs, abilities and ages of the kids and youth players you’re working with.
And don’t be shy about progressing your drills for certain players if they are clearly ahead of the rest of the group.
And don’t be restricted by the drills here – a lot of these concepts can also be built into training drills with equipment such a baseball rebounder for example.
Finally, a lot of these drills are great to help you improve your throwing skills at home and can be easily adapted to the training field – just make sure you take safety into consideration and you’re ready to go.