Baseball Fielding Drills

The Art of Catching, Throwing and Fielding Like a Pro
Have you ever watched a game from the stands or live on TV and wondered how the pros make fielding look so natural?
Defending against grounders, line drives, and fly balls is an art form and often fielders don’t get the full credit they deserve unless they pull off an unbelievable catch.
Often fielding looks simple but in reality, it involves a combination of athleticism, instinct, experience, and cat-like reactions.
Whether you’re a coach or parent looking to develop your kid’s fielding, or you want to improve your own fielding game and start defending like a pro, you’ll need to not only put the hours into training but also have a solid understanding of the fundamentals of fielding.
That’s why we’ve put together this guide to provide you with all of the knowledge you’ll need to become a better fielder.
In this guide, we’ll take you through the full range of fielding fundamentals from positioning, techniques to the training drills for each section. We’ll also take a look at some must-have equipment to help you step up your fielding,
Armed with this knowledge, you’ll soon be fielding like a pro, getting in all the right defensive positions, getting your body in front of the ball, and making super clean and accurate throws.
Note: The drills have been categorized by position and there’s a variety of drills that suit all age groups and abilities. But, you can mix and match these drills across positions and abilities how you see fit. For example, some of the drills across the infield section can used for 1st, 2nd and 3rd basemen.
Also, a lot of these drills can (should for the most part) incorperate fielding equipment such as; fungo bats, rebounders, training gloves, and sometimes even weighted balls.
Baseball Fielding Coaching Fundamentals: Catch, Throw & Field
Catching
Developing catching skills requires hand-eye coordination, footwork and not being afraid of the ball – something especially useful to combat in a young player’s game.
Throwing
For throwing, it’s easy to start judging quality by the distance the balls thrown. However, putting a focus on accuracy and injury prevention will build a solid base to work from.
Fielding
Finally, for fielding in general, it’s important to have a great first step but also already have a good positioning and fielders stance before they’ve even made the move to stop the ball.
Infielder Drills: 1st, 2nd, 3rd Basemen & Shortstop

The infield is composed of four players – the first baseman, the second baseman, the shortstop, and the third baseman. Each of these players has a specific role and is typically selected on their suitability for the position.
The roles of the first, second, and third basemen are pretty self-explanatory. It’s their job to cover their respective bases although they may be called upon to move and adjust their role according to the situation in the game. Quick plays and changes are not uncommon for infielders.
The shortstop has a pivotal defensive role in the team and is often considered the ‘captain of the infield’.
It’s the job of the shortstop to cover the space between second and third base and a successful shortstop needs an accurate throw as well as the ability to clean up loose balls.
First Baseman Drills
To kick off our fielding drills guide for, it would make sense to start with…well, the first baseman.
The first baseman takes up a position close to the first base. Usually, the first baseman will begin a play slightly behind the base and a few feet inside of the foul line. If the first base is occupied or the first baseman anticipates a bunt, they may move further back or closer inside accordingly.

The main role of the first baseman is to catch throws and deal with grounders landing at their feet before the opposition runner can make the first base so good hands are essential.
1st Base Fundamental Footwork
Why This Drill? Footwork drills specifically for first baseman.
- Drill 1: Stride to Catch: Move Focus is NOT prematurely striding.
- Drill #2: First Base Lightening: Coach / Additional player uses trigger words and phases to initiate the type of movement the fielder should make and simulate
- Drill #3: Around The World: Coach / Additional player throws different balls and fielder must movement accordingly to these throws moving around the cone / base.
Second Baseman Drills
Positioned in between first and second base (but more towards second), the second baseman must protect the middle of the infield – this is why they are often referred to as ‘middle infielders’.
Second basemen have a pretty tough job, especially on double plays when there are opposition runners on first and second base so they need to be fast thinking and have good reactions. Quick, soft hands are crucial to being a successful second baseman as well as a good pivot for double plays.

Due to their position, a right-hander is preferred and it’s extremely rare to find a left-handed second baseman.
Basic Footwork Drill
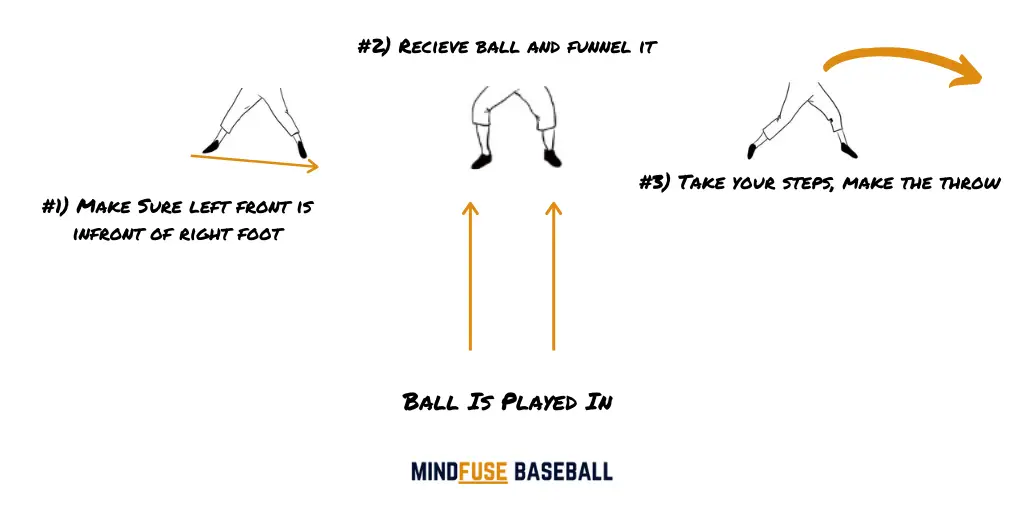
Why This Drill? This drill breaks the footwork down in 3 steps.
Details: The ball is fed in by the coach or another player. The fielder approaches the ball making sure his left foot is slightly in front of his back right foot. He receives the ball, funnels and then takes his infield steps and throws the ball.
Progressions & Regressions: Start with a normal pace of throw.
Then move to a higher intensity. For younger players, you can do this without actually picking the ball up and throwing it, and then progressing to the full movement as if it was a real game scenario.
Double Play Footwork
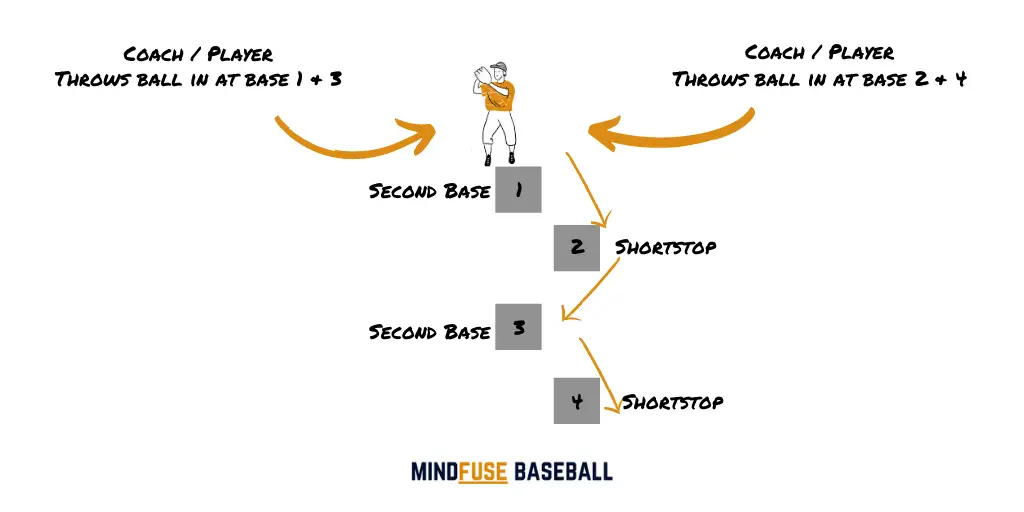
Why This Drill? This focuses on double play feeds from both the shotstop position and the second base position. This creates flexibility for the player but also improves development in both positions.
Details: Line up 4 bases, bags or markers. On markers 1 & 3 you’ll be the 2nd Baseman, and on 2 & 4 you’ll be the shortstop – with the balls played in from each side. The key focus is on the players footwork.
For second basemen:
- Left foot on marker
- Move right foot towards ball
- Right foot to land as you catch the ball
- Bring ball to the chest area and then throw
For second basemen:
- Left foot on marker
- Move right foot towards ball
- Right foot to land as you catch the ball
- Bring ball to the chest area and then throw
For shortstop
- Right foot on the bag
- Left foot towars the ball
- Left foot to land as you catch the ball
- Then throw the ball using normal infielding footwork
This is a great drill, but if it’s your first time. Slow the movement down and slowly work the pace up as it becomes more and more natural. This drill was originally taken from this video here.
Third Baseman Drills
Essentially, in baseball, the third baseman takes up a mirrored fielding position to the first baseman on the opposite corner near the third base.
They are most likely to be called into action when facing a right-handed batter (which can be often) to deal with infield fly balls and bunts.
The third baseman is usually the closest player to the hitter and needs excellent reactions and hand-eye coordination in order to deal with baseballs coming their way.
The Hop Drill
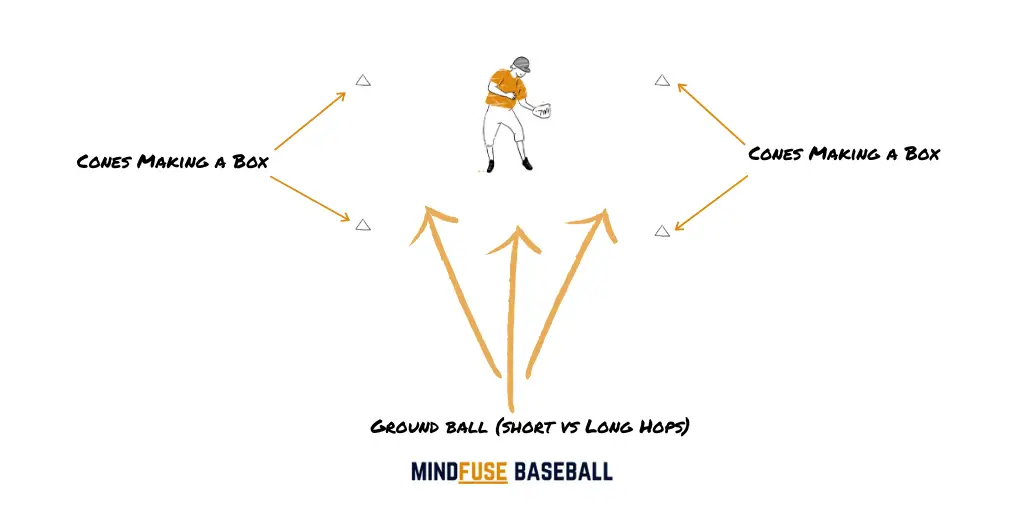
3rd Basemen don’t have much time to react, so this drill forces your 3rd baseman to select a variety of different hops to catch the ball in the ‘hot corner’.
Details: Set out a box with 4 cones. Coach or another player will feed in ground balls in different locations across the boxed area. The 3rd baseman must be ready to use a variety of different movements and hops to to field the ball with speed and efficiency.
Progressions & Regressions: Open or close the box where you see fit. Use of fungo bat to add more realism to the grounders.
Ball Familiarity
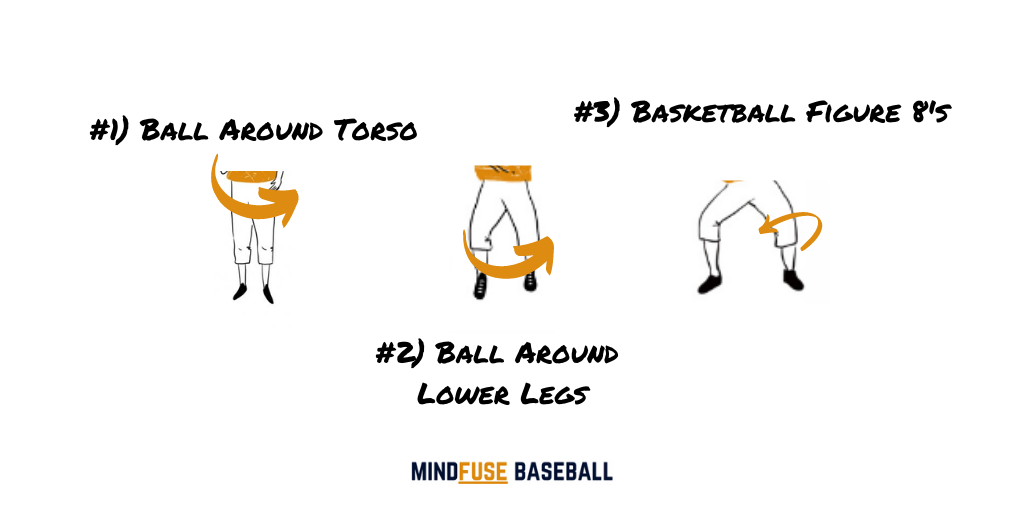
Ball Familiarity is a great way to get young players familiar with throwing, catching, the flight and weight of the ball. It also helps develop soft, relaxed hands. You can start this drill with younger players using a tennis ball to help them grow confidence and not be scared of the ball.
Setup:
- Progression 1: Fielder circles the ball around their torso
Progression 2: They then move to circling the bal around their lower legs - Progression 3: Finally, they move onto performing basketball figure 8’s.
This is a great drill for kids and youth players but can also be adapted for older players too. Try adding a competitive element to it by speeding up the ‘circling’ and and getting two players to reach a certain amount of ‘circles’ without dropping it.
Shortstop Drills
The shortstop is a highly challenging position as statistically speaking, they are called upon to defend more balls than any other position.
This is because the majority of hitters are right-handed and send balls to the area of the field between second and third base, where the shortstop takes up his/her position.
Like the second baseman, the shortstop also has to throw out runners and deal with double plays.

Historically, shortstops were almost exclusively defensive-minded players and not necessarily decent hitters, although this has changed in the modern game.
The shortstop is often the main communicative link between the infield and outfield players and takes on the responsibility of dictating the defensive strategy on each play.
They also link the outfield and infield on longer plays when the ball is hit towards the boundary.
Throw The Goalie
![Baseball Drills for 5 Year Olds: Throw The Goalie [MindfuseBaseball.com]](https://mindfusebaseball.com/wp-content/uploads/2020/04/Baseball-Drills-for-5-Year-Olds_-Throw-The-Goalie-2.png)
Why This Drill? This drill introduces your players to catching, getting down low to make the stops and help them understand and read different throws between the bases.
Details: Real simple setup with this one – have one player stand between 2 cones with a glove. Have another player stand opposite and throw balls towards the player in ‘goal’. Ensure the thrower throws different throws both in the air and along the ground.
Progressions & Regressions: Move the cones further apart. You could also change the distance the thrower is from the ‘goalie’.
Drop Ball
Because shortstops are generally called upon in a game more than most, this drill from Kbands Training is a great one to work on your Shortstops reaction skills.
Again however, it’s a great drill no matter what position you’re playing or coaching on the field.
If you want to improve your fielder quickness and reaction skills – Drop Ball is a great drills to use. It can be done with 2 players or a coach and a player. For this example we’ll just call them Player A and Player B.
Setup: Setup Player A and Player B anywhere between 4-8 ft away from each other. Have player B hold a baseball out laterally by their side.
As Player A starts to move Player B drops the ball. Player A has to get to the ball before the ball drops to the floor.
There are a few other variations you could try with this drill:
- Have a third player / person say a trigger word. On the trigger word the drop starts and Player A must make the the catch
- Another variation is a question an answer game. Player B asks a simple baseball question. When Player A answers the correct answer he moves and the ball is dropped.
Outfielder Drills: Left, Center, Right Fielders

The outfield is made up of the center fielder, right fielder, and left fielder. These are the three deeper sitting players who are gifted catchers with a long-range, powerful yet, accurate throwing arm.
Outfielders must possess speed and the ability to catch fly balls on the move. They also need fast reactions and good instincts when knowing where to throw the ball once they’ve received it.
A wrong decision at a crucial moment in the game can be costly for the team so a dynamic mind to deal with opposing base runners is essential.
Another key role of the outfielder is to back up the infield players. Infielders aren’t going to effectively deal with every ball that comes their way so the role of the outfielder is to provide cover for any infield mistakes.
This requires a high degree of concentration and focus.
Left
The left fielder covers the left outfield corner of the field and has to back up the shortstop and third baseman.
- Can end up facing a lot of line drives
- Should have a good throwing arm in order to receive and return the ball to the bases,
- Have the shortest distance to throw to third from all of the outfielders.
Center
Center fielders lead the outfield defense as well as having to cover large distances.
- Priority when it comes to catching balls
- Have to be able to react to balls struck on all sides
- Need great communication skills
- They also have the power to call off the infielders if they think they have a better read on the flight of the ball.
Right
Right fielders require the strongest throwing arm as they cover the largest distances.
- have to defend them effectively and return the ball at speed so concentration is a key attribute.
- Historically, the right field has been the position of some of baseball’s most legendary players – think Babe Ruth or Bryce Harper
Throwing Distance
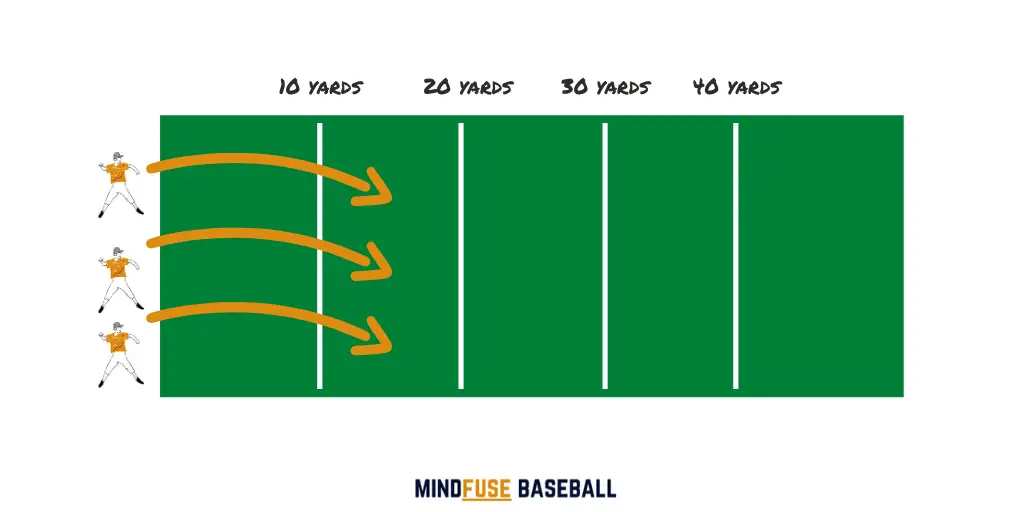
This drill’s a great one for both small and large groups. Players are encouraged to throw the ball as far as they can and use markers set out to measure the distance of their throws.
Setup: Mark out a starting throw line. And then measure upto 50 yards in distance placing a marker at each 5-10 yard interval. Players must throw the ball as far as they can and measure the distance by where the ball first bounces.
They then collect their balls. I’d recommend, if you’re coaching a large group to do this all at the same time to avoid any safety issues.
To speed up the setup phase, look at using the yard lines on a football pitch.
Wall Ball
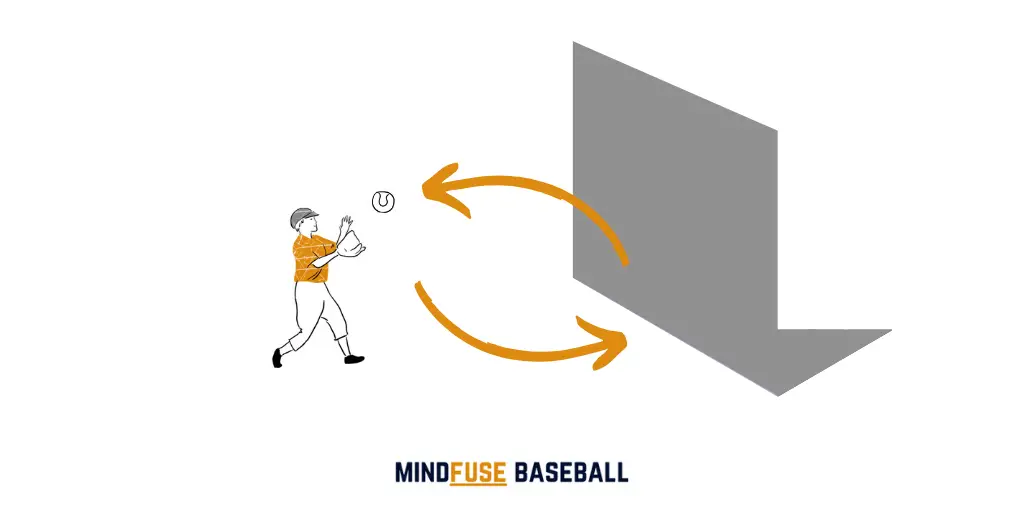
Ages: 7 Years +
A game that we’ve all played some variation of at some point in our lives. Wall Ball can be used to simulate different types of balls such as; line drives and short hops. It’s also can be used in large groups too as a knockout competitive game.
Setup: Start by getting your player to face a wall with a glove in hand.
They must throw the ball at the wall and then get into position to successfully catch the ball. To progress this drill a little further have a second player throw a ball at the wall to add more realism to the drill.
Elite Outfield Drills
Drill #1: No False Steps
This drill aims to help outfielder become more efficient with their time and energy when it comes to performing their drop step.
Drill #2) Flip Your Hips Drill
Depending on game situations you’ll need to flip your hips in a different direction. This drill helps outfielders with their hip flip response time. You’ll need at least 2 players for this drill.
Drill #3) The Box Drill
Setup 3 cones representing a box with the player in the middle. This drill works not only on perfecting your drop steps but also works on multi-directional movment
Baseball Fielding Fundamentals: The 6 F’s of Fielding by Perry Hill

All infielders should know the 6 F’s of fielding, a concept designed by professional baseball coach, Perry Hill.
As a trainer, Perry Hill has worked for the Texas Rangers, the Detroit Tigers, and the Pittsburgh Pirates amongst other teams and has a World Series title under his belt, so he definitely knows his stuff when it comes to baseball.
Essentially, the 6 F’s refer to six individual baseball fielding fundamentals, skills, or actions that apply to successful fielding from little league all the way up to the MLB.
They outline a framework for good practice so if you’re not aware of the 6 F’s, it’s definitely worth familiarizing yourself with them to improve your game.
But what are the 6 F’s? Let’s take a look…
'Feet' & Preparation Drills
Your feet are crucial to becoming a good fielder. Proper footwork prepares fielders for the moment that a hit ball enters the field of play and enables fielders to react quickly.
When thinking about your feet before a defensive play, consider the following:
#1)
You need to use your feet to move towards the ball
This saves time which is valuable in preventing the opposition from scoring runs and allows fielders to defend the ball from better angles and shorter distances.
#2)
As the pitcher prepares to throw, your feet should be in an active position.
That is to say, shoulder-width apart, facing the batter with your knees slightly bent.
#3)
Take a few small steps to distribute your body weight and get yourself moving in order to give yourself the best chance.
Staying stationary when the ball is struck will significantly reduce your reaction time.
Creep & Hop
Why This Drill? Not quite a drill but this video focuses on the creep and hop, ready stance positions and overall body movements to ensure you are prepared for the incoming hit.
Details: Can be practiced within a group or individually. Important areas to focus on are: 3-6 feet back from position, creep and hop into the movement, staying on the balls of the feet and keeping thumbs up.
Progressions & Regressions: Start the practice without a ball then move to simulating a real-game scenario
'Field' Drills
So you’re light on your feet and well prepared to react to the batted ball. The next stage is to physically field the ball.
This is a dynamic skill – one that you’re required to carry out on the move quickly so it’s important that you’re committed and your technique is correct.
Ideally, a fielder wants to consistently take the ball in front of their body and following these steps will allow you to do that:
#1)
Remember your feet? They should be shoulder-width apart which will give you a nice, wide stance.
As you go to field the ball, this stance actively encourages you to get low with your glove hand in front of your body in your line of sight.
#2)
Keep your eye on the ball and your glove hand in front of your body.
This will allow you to react to the flight of the ball or any unexpected hops on grounders.
#3)
Try to keep this wide stance throughout the fielding process as it will give you more stability and balance.
A shallow stance can throw you off balance and reduce your chances of collecting the ball.
Highflyer Catching Drill
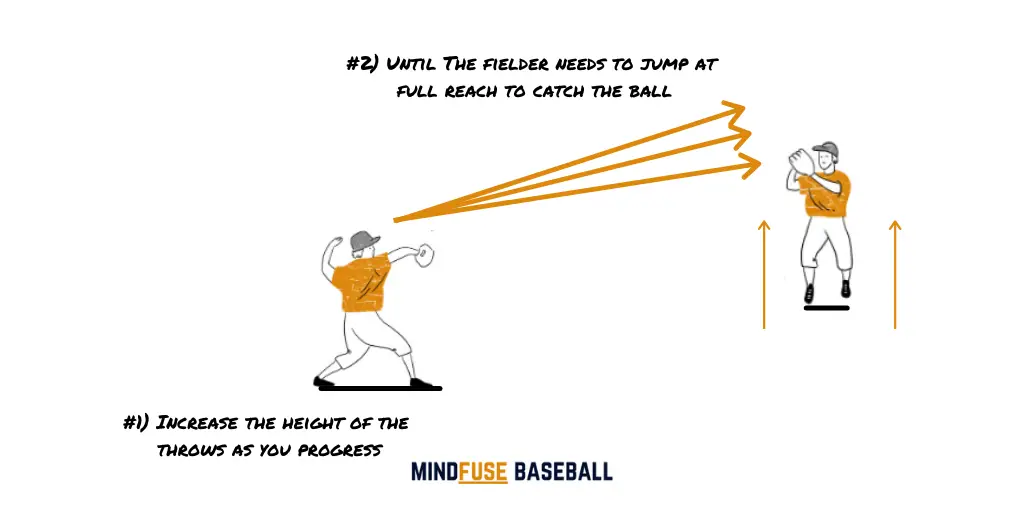
Real Here we’re focusing on something a little different and fun. This drill aims to improve a fielders catching when the ball is above the center of body with one hand.
Details: 2 players stand opposite each other (vary the distance between the players) The ball is thrown a few inches above the fielder head with each throw slowly going higher and higher above the fielders head. The fielder must read the flight of the ball and catch it until they are at full reach.
Progressions & Regressions: reach Start with easier catches and move towards throwing the ball at enough distance where the catcher must be at full reach with one hand.
'Funnel' Drills
Now you’ve reacted to the hit and fielded the ball, it’s time for the third ‘F’ which refers to gathering the ball and preparing your body to throw it on. Perry Hill refers to this as ‘funneling’ the ball.
Essentially this is the combination of a number of movements that will bring the ball to the center of your body and place it in the optimal throwing position.
The funnel stage of fielding is made up of the following movements:
#1)
Collect the ball and take it towards the center of your chest with both hands together.
#2)
This is a solid position and it’s fundamental to generating a powerful and accurate throw.
#3)
Transfer the ball to your throwing hand. Prepare for the throw with your hand over the top of the ball and your elbow high.
Perry Hill Funnel Drill
Why This Drill? The focus is on loosening your hands, bringing the ball to the middle of the body in a thumbs up position.
Details: When the ball is hit towards the fielder, the field is made, the ball is brought to the middle of the body which gives the player a foundation of balance and power and then they discard the ball to the side ready for the next ball.
Progressions & Regressions: Progress same technique and movement into real-game scearios within training. You can also isolate the upper body by getting on your knees too.
'Footwork' Drills
We previously talked about the importance of our feet in the first, preparatory stage. Now let’s consider how proper footwork can be beneficial to our throw.
As you funnel the ball, your feet should be working and preparing for the throw as your feet are going to play a pivotal role in generating power and accuracy.
#1)
Once the ball is funneled and your upper body prepares to throw the ball, your feet need to start moving.
#2)
Step towards your target – if you throw right-handed, you’ll want to step with your left foot and vice-versa.
#3)
This step is going to open up your body and create plenty of space for your arm and elbow to follow through.
Footwork Ladder Drills
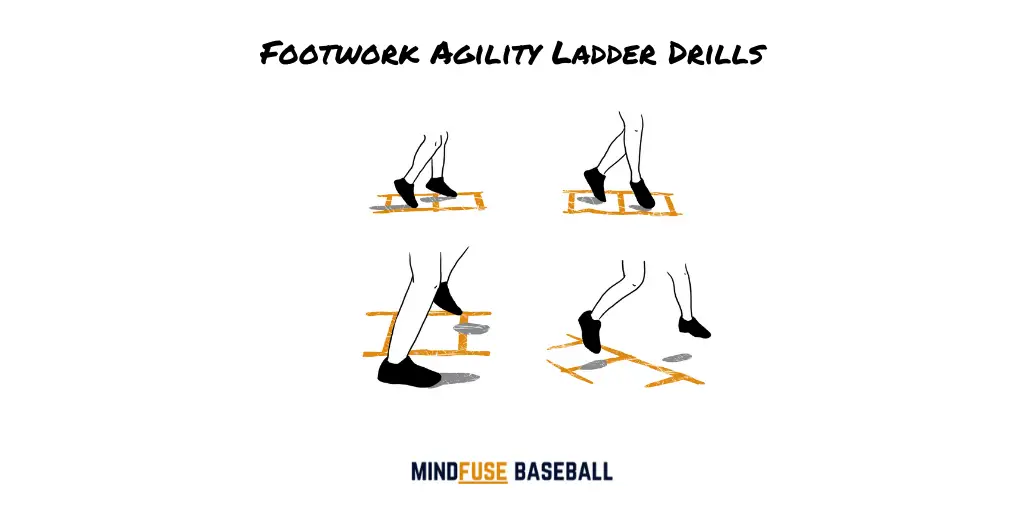
Why This Drill? This drill is taken from our baseball conditioning guide and works on developing quick but efficient movement of your feet.
Details: You’ll need a ladder to do the drill. Perform different footwork technqiues such as; in and outs, crossovers and hops.
4-Ball Footwork
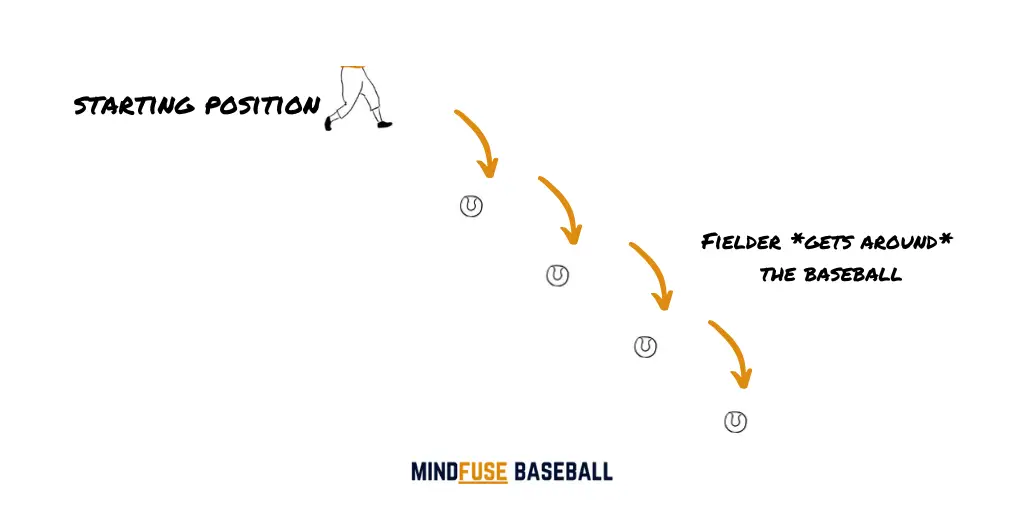
Why This Drill? 4 Ball Footwork is a great drill to coaching the correct approach from both sides. The focus is on getting around the ball.
Details: funnel Place 4 balls in a row. The fielder must get around the ball using the correct footwork, and then simulate a pick up, funnel and throw. Remember, coming back the opposite way there will need to be a slight change in the approach.
Progressions & Regressions: Move to a more realistic situation where the player actually picks up the ball and throws it towards a target (batting tee for example)
'Fire' Throwing Drills
This part of the process refers to the throw – you now need to release the ball with a combination of power and accuracy in order to hit your desired target which at times is going to be far away.
This is all going to be taking place at speed and should be relatively instinctive, but we can still break it down and consider the following aspects of the ‘fire’:
#1)
Find your target and fix your vision on it to ensure accuracy. Get a solid grip on the seam of the ball.
#2)
Starting with a high elbow, fully extend your arm during the throw.
#3)
Follow through and release the ball at the proper angle to create the perfect flight.
Ready Aim Throw
![Ready. Aim. Throw. Baseball Drill [MindFuseBaseball.com]](https://mindfusebaseball.com/wp-content/uploads/2020/04/Ready.-Aim.-Throw-Baseball-Drill.png)
Ready Aim Throw is a throwing game that helps your players develop their throwing accuracy.
Setup: Setup a ball on top of a batting tee. Then place markers or cones down for the different throwing distances. If a player hits the baseball on top of the batting tee, they then move back to the next distance.
Progressions: If you’ve got a few players to work with, you can turn this into a mini-competition between players. You can also use a ‘chain’ setup – this is where if a player hits the target they move back a distance. If they miss at the next distance then they must move forward again to the cone nearer to the target. For this game you might want to give each player a number of ‘lives’ before they concede a cone and move back.
Bucket Aim
![Baseball Drills for Kids: Bucket Drop [MindfuseBaseball.com]](https://mindfusebaseball.com/wp-content/uploads/2020/04/Baseball-Drills-for-Kids_-Bucket-Drop.png)
Bucket Aim is another throwing accuracy game. If you don’t have any buckets you can use other targets too hit.
Setup: Set up 3-5 targets around the thrower. The thrower must either hit the targets or get the ball inside the bucket to score a point.
Thowing Power Drills
While the previous 2 drills focus more on the accuracy of your throws, these two drills focus more on the power and velocity of your throw. velocity These drills ought ot be incorperated into your throwing drill routine for best results.
Drill #1: Hop Hop Throw
The first drills focuses on your movement prior to making the throw. By incorperating a 3-hop sequence with third hop exploding forward and making the throw. It’ll also create the conditions to help develop balance and co-ordination too.
Drill #2: Explosive Weight Transfers
By getting into an adapted lunge positions as if you’ve just thrown the ball – you’re going to rock fowards, then backwards and then explode into throwing the ball.
Triangle Target Throws
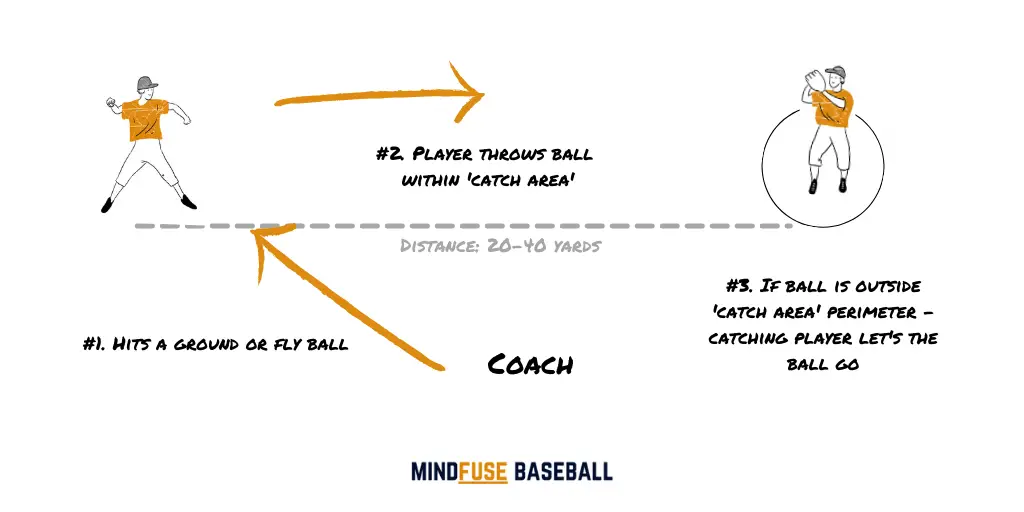
Age Group: Youth Players +
Another drill to improve throwing accuracy.
Setup: The coach (or another player) hits a ground or fly ball to the first player (on the left). The player must catch the ball shift their body position and make a throw to the 3rd player who is positioned in a box. If the throw is outside the box, the 3rd player is to let the ball go.
Progressions: You can pick the intensity up as you wish. You can also incorperate a reaction time variation by getting the player to lay face down and calling the ball as a trigger for the 2nd player get up and make the catch.
'Follow' Through
Following through on your throw is important for a number of reasons.
Firstly, it helps create more momentum and allows you to achieve a greater distance on the throw than if you were stationary.
Secondly, it encourages good technique and will help avoid shoulder injuries. Finally, following through will take you closer to the action so you can react to the next phases of the game.
The follow-through is fairly straightforward but it’s still important to break it down into parts:
#1)
Once you’ve released the ball, keep moving forward with a few steps. This will ensure power and accuracy.
#2)
Keep your eye on the flight of the ball throughout this process to guarantee a direct trajectory.
Ground Balls vs Line Drives vs Fly Balls

A successful fielder needs to have the ability to deal with a variety of balls. Even elite-level batters struggle to hit every ball in the same way and it’s important to remember that no two balls will ever be hit in the same way.
Fielding is 100% reactionary and to be any good, you need to always be on your toes and prepared for all outcomes.
Here’s a rundown of the three main types of ball you can be expected to face as a fielder…
Fielding Ground Balls: Drills
Anyone who’s played infield will tell you how difficult grounders are to deal with.
They’re unpredictable even on a smooth surface and can hop up, down or sideways so fast reactions are crucial. It’s not just infielders who have to mop up grounders though.
Occasionally, a rogue ground ball can make it through the front line calling the outfielders into action.
Defending ground balls requires fielders to concentrate and follow the 6 F’s mentioned earlier but there are a few other tricks that you can use to improve your ground ball game. Here are our top tips for fielding ground balls:
#1) Stay on your toes
Perry Hill talks about the importance of footwork when fielding and it’s no exception when dealing with ground balls.
Be dynamic – keep yourself moving easily from foot to foot as the ball is pitched, that way you’ll be ready to react to the hit.
It’s much harder to move quickly to the left of the right side from a stationary position.
Grounder T-Ball
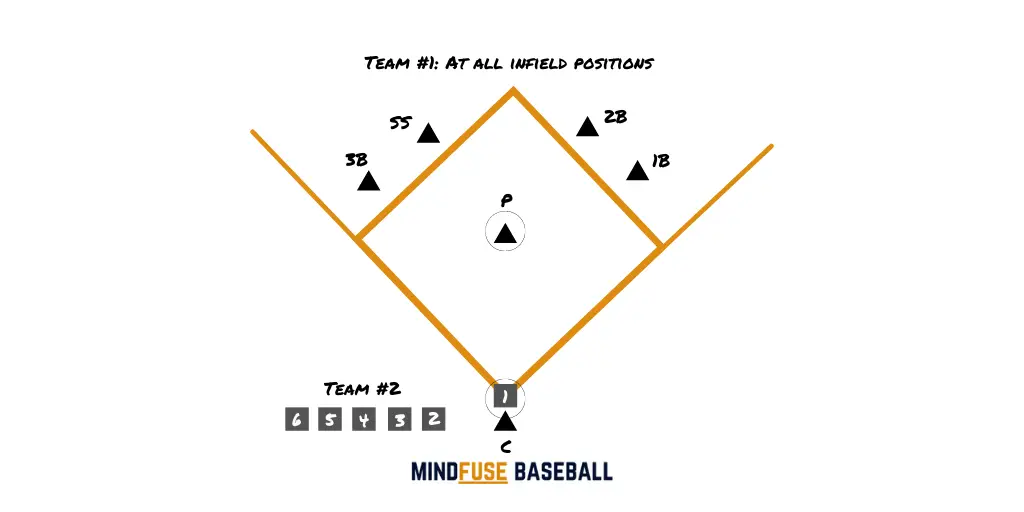
Why This Drill? This drill is specifically designed to help your team deal with ground balls and help them react accordingly.
Details: Split your group into 2 teams – hitters and infielders. The hitters (or coach if you’re just working with your fielders) will hit grounders for the fielding team to respond too. This is like a mini-conditioned game specifically to help you fielding team preapre for and respond effectively to grounders.
Progressions & Regressions: This drill obviously will work better once you’ve coached the fundamental beforehand – however you can progress this into a game between hitters and fielders. If line drives or fly balls are hit it doesn’t count. The batting team is awarded a point if the ball makes it through the infield and fielders are awarded a point if they successfully defend the ball.
#2) Get In Front of The Ball
If you’re not positioned behind the ball, you increase the chances of the ball passing your body. By placing yourself behind the ball, your body creates a barrier that blocks the path of the ball.
Through The Legs
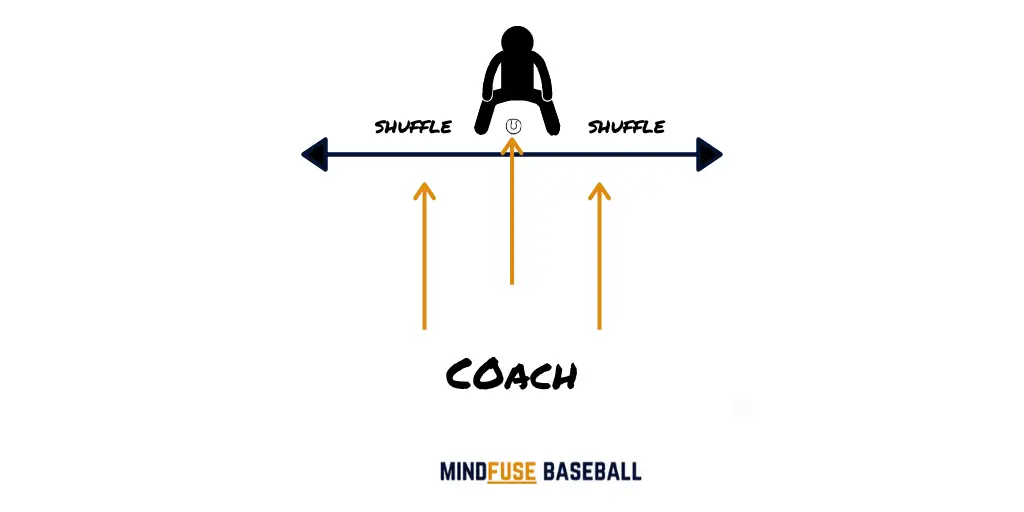
This is a great fun drill that focuses on getting your young players to position themselves in front of the ball and get familiar with tracking the ball and shuffling side to side.
Setup: Coach rolls balls towards players. Players must shuffle to get in front of the ball and let the ball go through their legs.
You can progress this by getting players to work in pairs and taking turns to roll the ball towards their partners.
You could also set up markers behind the opposite player for each thrower to aim for. This progression not only helps develop the player who is tracking the ball but also works on developing the hand eye coordination of the thrower too.
Finally, once they get the hang of tracking the ball you can introduce picking up the ball up both bare hands and using gloves.
#3) Relax
Avoid tensing up. This can cause the ball to ricochet off your glove, arms or legs. Staying calm helps you anticipate the better and scoop the ball up easier.
Revive
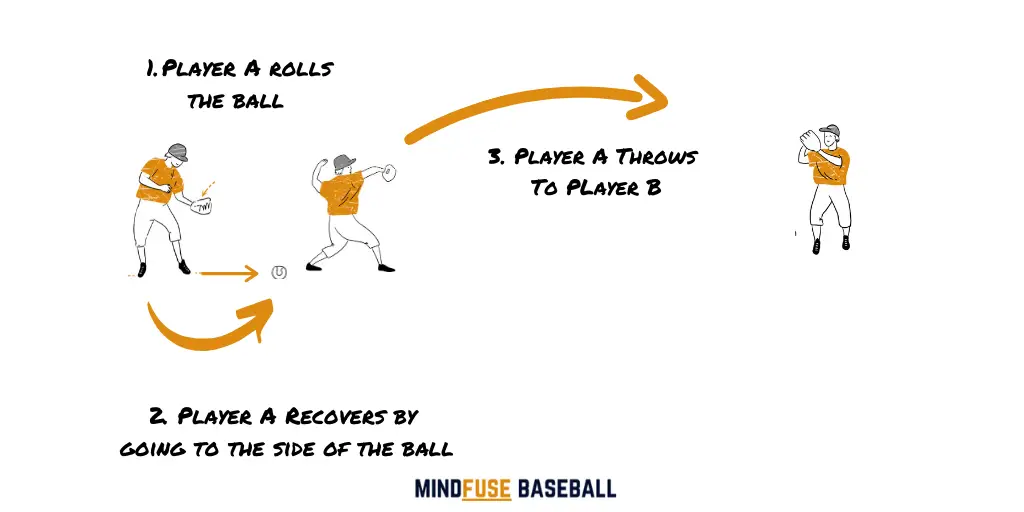
Mistakes do happen, however. Revive works on these very scenarios by introducing a recovery drill to help players ‘revive’ themselves after a mistake.
Setup: This drill involves 2 players. Have each player stand about 40ft apart. To start the sequence; Player A rolls the ball out in front of them to trigger the recovery move.
Player A must get to the side of the ball, pick it up and then throw the ball to Player B. Player B then repeats the sequence.
This can be progressed to involve a 3rd player that adds more realism into the first throw and the drill can also be used with reaction balls too.
#4) Glove flip
Keeping your glove hand palm up throughout the funnel process will save time in transferring the ball to your throwing hand. Imagine your glove hand to be holding a bowl of hot soup that you don’t want to spill. That way you will avoid turning the glove downwards and encourage a good scoop of the ball.
Glove Flip
Why This Drill? There are times in a game when you’re going to have to make a glove flip. This video from You Go Pro Baseball explains how to do that. And of course, the more you practice on it in training, the more instinctual it becomes when you need to call upon it in a real-game scenario.
Details: Drive the ‘heel’ of your palm towards the ball as you make the field. For backhand or sideways ‘styled’ flips – you’ll need to focus on removing the wrist action from your flip.
Progressions & Regressions: Start with getting used to the technique, the progress to throwing the ball to mimic a game situation. This is all about repetition.
#5) Identify your target and release the ball
Once the ball has been successfully funneled, you will need to choose where you want to throw it. Transfer the ball to your throwing arm, step in that direction of your target, and release the ball.
Fielding Ground Balls On The Run
It gets a bit trickier when you have less time to get behind the ball.
Sometimes a grounder can roll to your side at such speed that it requires you to cover some distance to field it.
A top tip for fielding grounders on the run is to not slow down.
Waiting for the ball to come to you is useful when you have time to get your body behind the ball and create a barricade but when that’s not possible, you’ll need to move to meet the ball.
If the ball is in front of you, don’t charge it down as this will decrease your depth perception and increase the margin for error.
Only run to the ball when it’s played away from your position
Moving Square
![Baseball Fielding Drills: Moving Square [MindFuseBaseball.com]](https://mindfusebaseball.com/wp-content/uploads/2020/04/Baseball-Drills-for-5-Year-Olds_-Moving-Square.png)
Moving square gets players to develop their throwing and catching skills under more realistic conditions.
Setup: Place 4 cones or markers down that create a square shape. Place one thrower in the middle and another player at one of the cones.
Progressions:
- Start with a simple throw and catch drill
- Then you can move onto a throw, catch, run to the next cone repeat sequence.
- Further progressions to this for older age groups:
- Have the thrower name the cone the other player should run too
- Have the catcher try and catch the ball as they are running
Catching Line Drives: The Most Dangerous Catch
Let’s be honest, line drives are incredibly hard to field against and they don’t occur often. When they do happen they’re impressive to see but as a fielder, you want to avoid admiring the sweetly struck ball and defend against it. But how?
Confidence is key.
It’s understandable that younger or more inexperienced players might fear putting themselves in front of a ball moving towards them at speed (we have a drill to combat this on our but this is something that good fielders need to eliminate from their game.
Let’s break down the phases of catching a line drive:
#1) Track The Ball
This is the most important step to catching a line drive.
Your first move is crucial as it can determine the whole outcome of the play.
Take a moment to read the flight of the ball. In an ideal world, we would have plenty of time to do this but more often than not, this is a split-second.
#2) Get in Position
If you miss step 1 and react too quickly, you run the risk of going in for the catch prematurely and misjudging the ball’s trajectory.
Once you’ve got an idea of the trajectory of the ball, you’ll need to move and position yourself correctly.
Judge where the ball is going and move forwards, backward, left, or right according to the flight.
#3) Glove First
Always meet the ball with your glove and no other body part.
Your glove has a reinforced leather palm for protection and will take the brunt of the impact.
Keep your arm outstretched in front of your body to stop the ball from hitting you or getting away.
#4) Don’t Shield Your Face
Naturally, we want to protect ourselves when something is coming towards us at speed.
Instinct dictates that we should tense up and shield our bodies and faces from fast-moving objects, but this only increases the risk of getting hurt.
Keep your glove away from your body – especially your head.
Get In Front
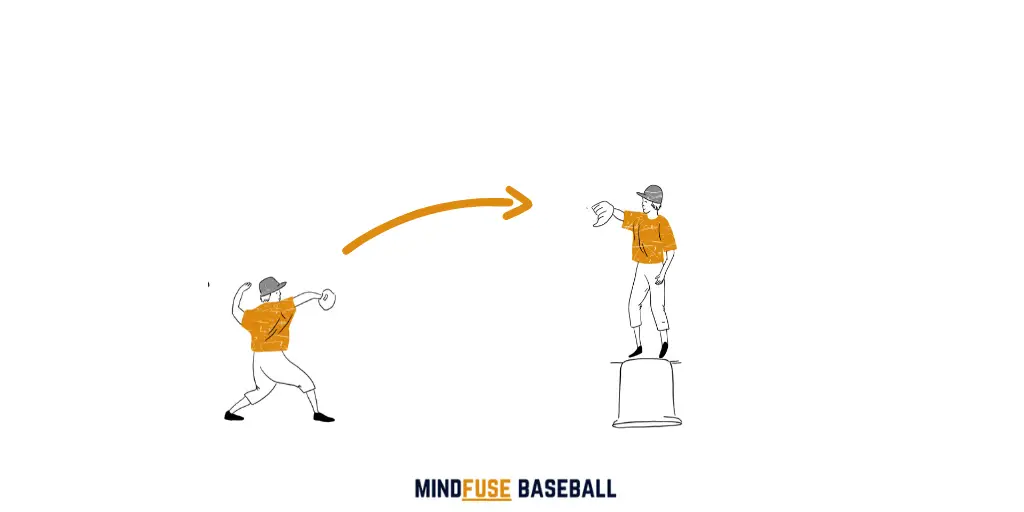
Fun drill, with the idea originally taken from ZONEDSportsAcademy.
The idea is simple; get your player to stand on a bucket or a chair to force them to stay in position and catch the ball without being scared.
By getting your player to stand on something you take away their ability to reactively move out of the way of the ball and build confidence in staying in front of the ball and their ability to catch the ball.
Setup: Get a bucket or chair and have your player stand on top. Start to throw balls to them. The player must catch the ball with their glove hand. You can progress this drill in 4 stages:
- First: Use a tennis ball: Get your player to tap the the tennis ball away using the palm of their hand with their fingers facing the sky.
- Second: Get them to progress to catching the ball with their glove hand
- Third: Use a glove
- Fourth: Progress to using a baseball
Catch Chain
![Baseball Drills for Kids: Catch Chain [MindfuseBaseball.com]](https://mindfusebaseball.com/wp-content/uploads/2020/04/Baseball-Drills-for-Kids_-Catch-Chain.png)
This is another throwing and catching drill where both players have to work together to build a ‘chain’ of catches at different distances.
Setup: Start by placing 3 markers down at different distances for each player. Both players start on the same opposite marker with a baseball glove. To move back to the next marker they must make 5 successful throws without dropping the ball.
Intercept
Ages: Youth Players (10+)
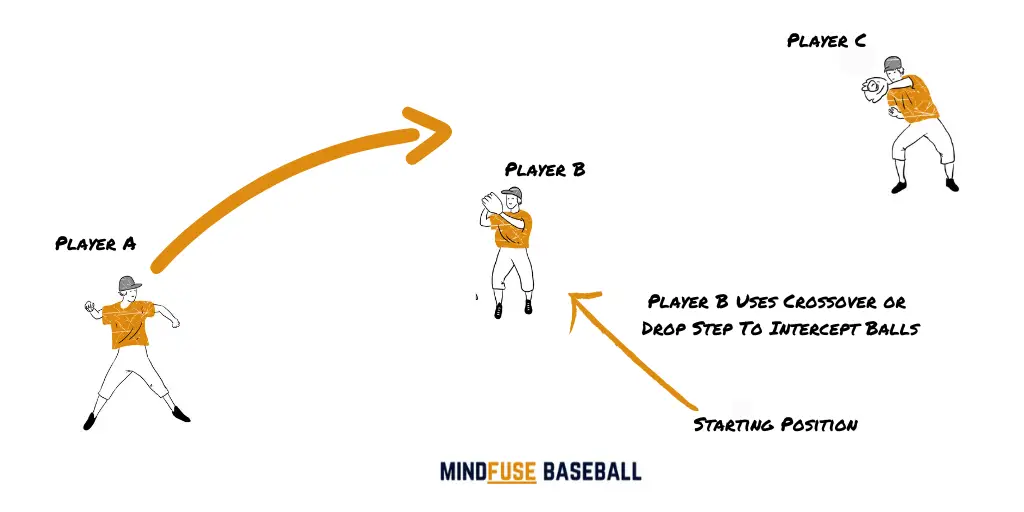
This drill is particularly useful for getting your players to develop the skills needed to field line-drives while using a crossover or drop step. Remember, a slow crossover step isn’t going to be very effective so it’s important to emphasize the explosiveness of the movement. For a drop step we want to eliminate backpedaling at all costs.
Setup: Setup 3 players. Player A is the thrower. Player B is there to catch the ball and Player C is the Interceptor. Player A and B are about 45-55 feet apart with Player C facing the coach about 30ft away. Player A throws a line ball towards Player B. Player C (or the interceptor) must use a crossover step or dropstep to successfully catch the ball. If the interceptor manages to catch the ball before it hits the ground, they then use a crop hop throw to return the ball back to Player A.
Depending on the age and the ability of the group, as the coach you might want to throw the balls. For older age groups however you can choose another player.
Fielding Fly Balls: Drills
Fly balls present advantages and disadvantages for fielders.
They wind up high in the air providing an ample amount of time to react, get in position, and anticipate the catch.
On the other hand, a ball flying high in the air against the sun can be pretty tricky to keep track of, not to mention the fact that they come down at some speed!
Here are our top tips for fielding fly balls:
#1) Track The Ball
As with line drives, you need to take a moment to judge the path of the ball to adjust your position.
The main difference here is that you’ll have more time.
But always make you are prepared and ready for the hit – this include both physically and mentally.
#2) Get Under The Ball
The only way to catch a fly ball is to position yourself directly underneath its path.
If you’re positioned too far behind the ball’s flight path, you’ll have to stretch your arms out too far in front, throwing you off balance.
Work on your anticipation.
#3) Block The Sun
Use your glove as it’s going to be outstretched already waiting for the ball.
You can also position yourself at an angle that puts the sun behind you.
It’s definitely worth investing in a good pair of baseball sunglasses.
#4) Relax
The key to catching fly balls is to stay calm.
Don’t doubt yourself because the second you start double guessing, you’ll panic and potentially drop the ball.
Breathe, keep your eye on the ball and remember the 6 F’s.
Find The Ball Drill
Why This Drill? Fly balls should be routine outs – but that doesn’t mean that you shouldn’t work on them. Drill is at the 8:08 mark.
Details: balls You’ll need a partner for this drill. Start with one player laying on their stomach face down so that they cannot read the play.
The other player throws the ball in the air and shouts ‘BALL’ – at this moment the player laying down gets up, locates the ball in the air and tries to make the catch. Remembering, to use an efficient drop step and removing any ‘drifting’ from their catch.
As the ball is about to be caught, the partner throws another ball and uses the same signal to let the fielder know it’s time to get ready for another catch.
This is a great drill that not only focuses on improving the ability to catch fly balls but also improves communication throughout your team.
Baseball Fielding Positions
Put simply, fielding is the defensive side of baseball. There are nine individual fielding defensive positions, each with its own specific roles.
The formation of these nine players is more often than not typical to all teams, however, every side is free to set up their fielders in response to the predicted behavior of the opposing hitter.
These nine fielders can be categorized into three groups; infielders, outfielders, and the battery. Let’s take a closer look at both the infield and outfield positions. If you’re looking for pitching related drills you can find them here.
Infielders
The infield is composed of four players – the first baseman, second baseman, shortstop, and third baseman.
It’s their collective duty to make up the first line of defense against the hitting side. They are responsible for fielding the inner area of the field and have to be on high alert for every kind of hit.
Outfielders
There are three outfielders – The left fielder, center fielder, and right fielder,
These positions are usually adopted by players who are adept at throwing at speed, over long distances. Outfielders need to be able to cover a lot of distances in short times and provide cover for the infield.