Baseball Hitting Drills

Ever watched a non-baseball guy or gal try and take a swing? Apart from the obvious dangers for everyone involved it can be pretty comical to watch.
Now, we don’t highlight this to make fun of people who haven’t played baseball – but we say it to bring attention to how hard it is to actually hit a ball with a baseball bat in the first place.
Bring that up a few levels into a competitive environment with skilled pitchers and you’ll quickly learn that hitting a baseball consistently, with power, accuracy and proper technique is no easy feat.
It takes years of practice, repetition and continuous improvement, learning and training to really hone your skills as a hitter.
A staple to this continuous development is the drills that you or your players do. The creativity you bring to your training and the level of dedication needed to progress.
In this guide I want to highlight a few baseball hitting drills you can get set up and start to improve your own or your players hitting skills.
skills so, get your bat ready, batting gloves on hand choose one of the drills below to upgrade yours (or your hitters) batting game…
Note: We’ve tried to categorize them as much as possible – but as you’ll notice a lot of these categories overlap – and therefore while we might only list 9 batting tee drills, you’ll likely find more batting tee drills in other categories.
Remember: Some drills will be better off using softer balls. For both safety and developmental reasons. You will need to ensure you choose the right ball for the group you are using. You can check out our baseball ball types post here – Warning however: number 7 is controversial…
Other Recommended Guides in Our Hitting Series
Warm Up Drills
The most important thing to remember when warming up before batting practice (or games) is: functionality.
This not only goes for your warm ups, but your hitting strength and conditioning workouts too.
In this section, I’ve outlined 3 baseball batting warm up drills you can use:
- First: Bodyweight and Mobility Warm Up
- Second: Bat Specific Weight Resistance
- Third: Making use of a highly effective piece of equipment that most coaches don’t talk about
While I’d recommend you complete them one after the other in a gradual way increasing the intensity – each warm up can actually be used on it’s own.
Bodyweight & Mobility Warm-Up
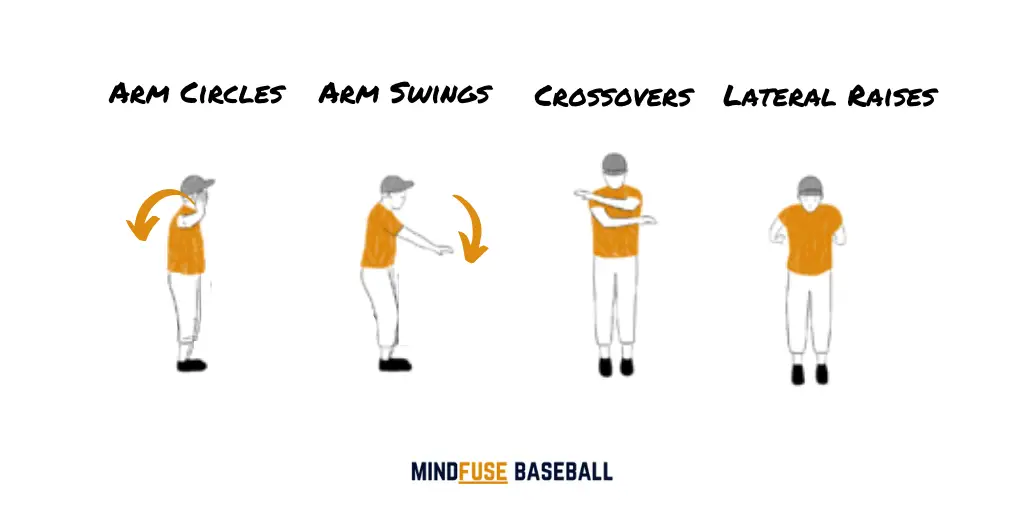
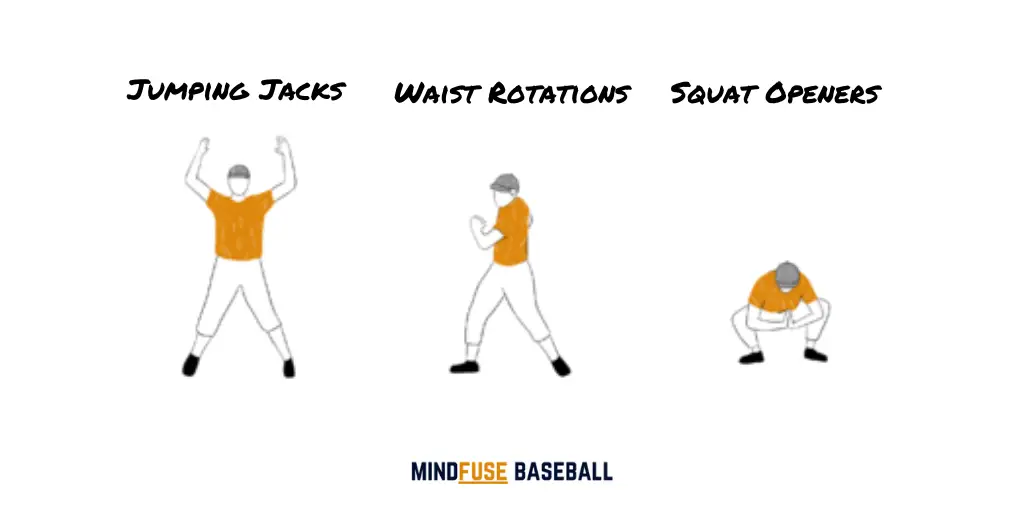
These are pretty easy exercises to perform for all ages and abilities.
And best of all? They require no equipment.
I’d recommend starting with your bodyweight and mobility exercises first before making your way into the other hitting warm up drills below.
Here’s each exercise in detail: Aim for 10-15 reps x 3 rounds through each exercise where applicable.
Arm Circles: Arms outstretched to the side and start by making really small circles the size of a baseball, then a soccer ball, basketball and finally work your way back down the sizes again.
Arm Swings: Full rotational arm swings.
Crossovers: Cross your arms as they make your way across your chest with the finishing position with your arms out by your side.
Jumping Jacks: Creating a ‘star’ shape with your body – aim for 30 reps.
Waist Rotation: Rotate at your hips from left to right
Squat Openers: Get in a sumo squat position and use your elbows to push your legs apart. While this can be performed as a stationary stretch, remember for any hitting warm you’ll want to make sure you aim for mobility – so keep slightly moving and rocking side to side opening your hips and groin up further.
Bat Weight Warm-Up
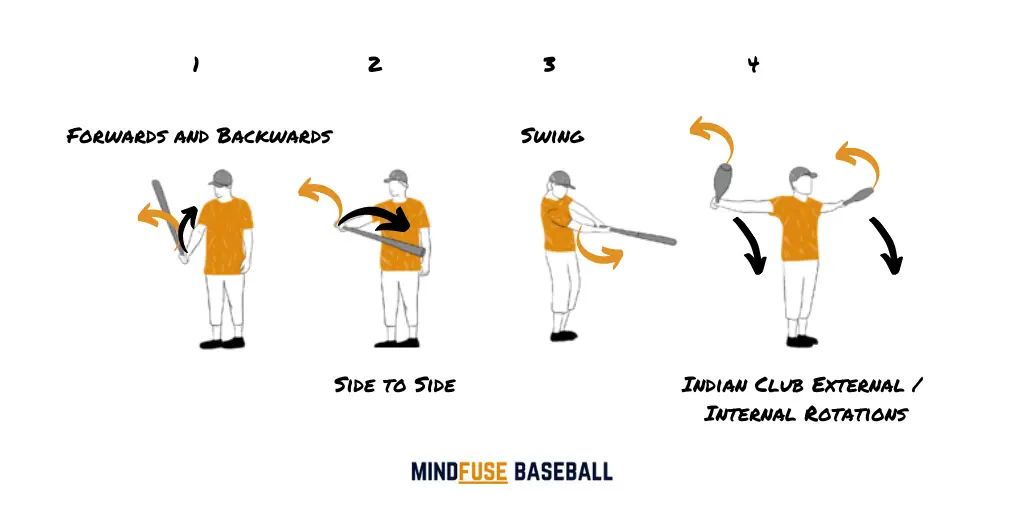
Next up in our warm up sequence we’ll use a bat to help warm up the joints for specific hitting movements.
You’ll also notice in illustration 4 – the bat is slightly smaller. This is because it’s not a bat but rather an Indian Club. You can perform all 4 movements with both a baseball bat and a set of indian clubs. Indian Clubs aren’t only great for your warm ups but can also be used in addition for your strength and conditioning workouts too.
I recommend you pick a pair up – you’ll be glad you did.
- Forwards and Backwards: Hold the bat straight out in front of you. Now let the weight of the bat take it forward (away from your body) and then use your wrist to bring the bat back towards your body. This is primarily a forearm and wrist dominated warm up.
- Side To Side: Again, hold the bat out in front of you and this time you’ll be moving the bat from left to right again with your wrists and forearm dominating the movement.
- Swings: For this movement you’ll break the swing into 2 movements. The first will be the starting position to stopping just before you would make contact with the ball, then whipping your wrists as if you were hitting the ball from a stationary position using just your wrists.
- Indian Club Rotations: Hold bats (or indian clubs) out to the side and start rotating your arms and wrist internally and externally.
Technical Hitting Drills
For Timing & Rhythm
While most people will congratulate the power a hitter can generate in their swing, or even the accuracy of their hit…
…there’s one part of a batter’s game that’s arguably more important – their timing.
Think about it, by timing your swing and therefore the connection with the ball you’re not only going to generate more power but you’re also developing a far more efficient swing.
Without solid timing the road to becoming a successful hitter walks into the realms of impossibility.
In short? Don’t sleep on the timing of your swing!
Rhythm and Timing Drill
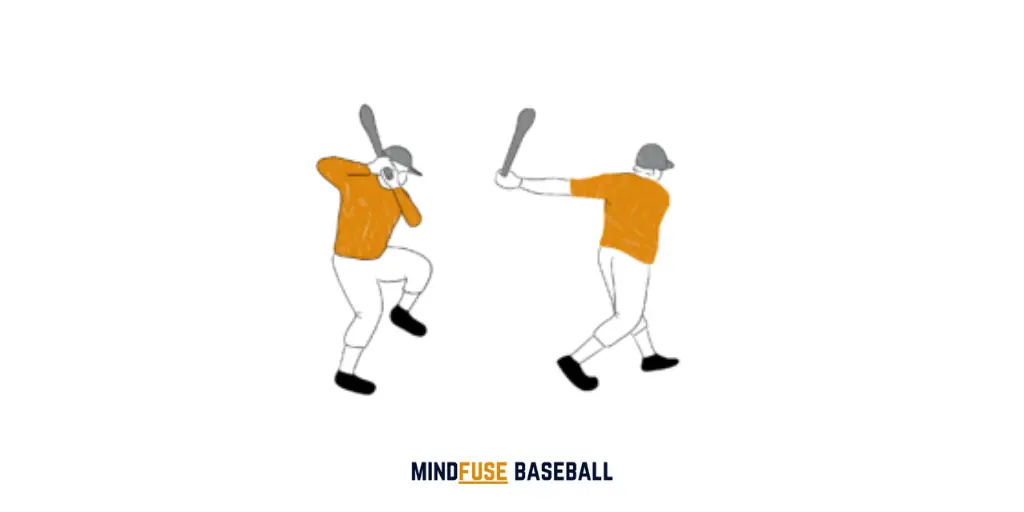
Before every swing forwards, we have to go backwards. Leg Kick / Toe Taps works on developing timing by making use of a toe tap or a leg kick (try different styles back into the load) to line our timing up with the ball. You can start this drill with a stationary batting tee – but you’ll want to move into a live ball being thrown by a coach or player.
When using an additional player, the batter uses the arm drop of the thrower as the trigger to start moving back – which is when you’ll perform your toe tap/leg kick etc.
This is good practice to get into as it’s one of those movements you’ll need to ‘automate’ without thinking about it when it comes to competitive games.
You’ll want to aim to have the heel in position by the time the ball is roughly halfway towards the plate.
Make sure you’re in an offensive position and well balanced to meet the ball with power and precision.
Speed Loading
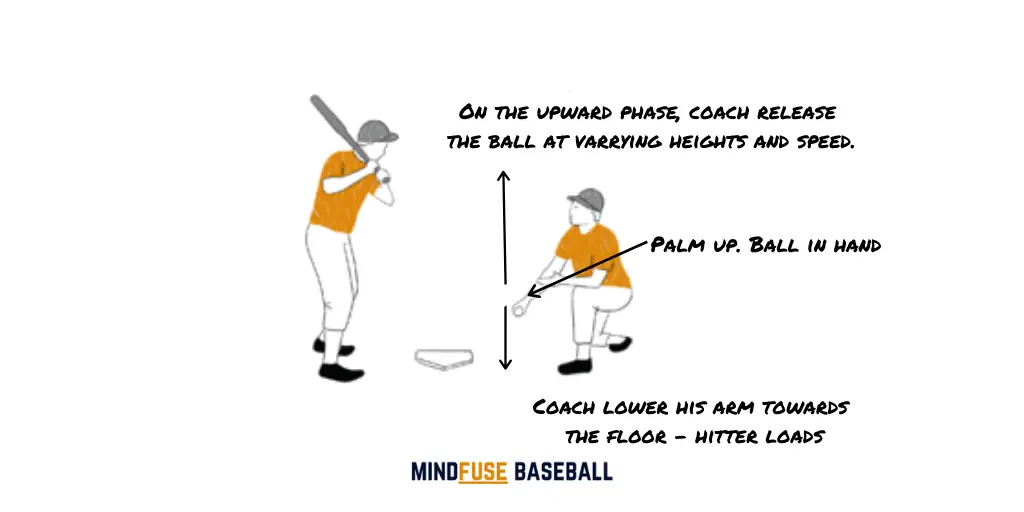
For a hitter to get loaded and get back they need to be in a good position.
To practice this, we use a drill called Speed Loading.
You’ll need 2 players – the hitter and the ‘coach’.
The coach is going to feed the ball in the air to the player at different heights and speeds.
To feed the ball, the coach is going to hold the ball in his hand palm UP. He’ll then lower his arm and on the upward movement he’ll release the ball.
The hitter is going to get into their load just as the coach lowers his arm so that by the time the coach raises his arm back up again the hitter is ready to hit the ball
Increase Power & Bat Speed
It’s no secret – every hitter wants to hit for more power.
When developing power in your hit, there are 3 key focus areas you need to be aware of:
- Separation: Between upper and lower body when making the swing.
- Driving Through The Ball: Making sure the hitter doesn’t stop at contact and is strong THROUGH contact.
- Increase Bat Speed: Faster the swing with a heavier bat – the harder you’ll hit the ball
Swing The Load
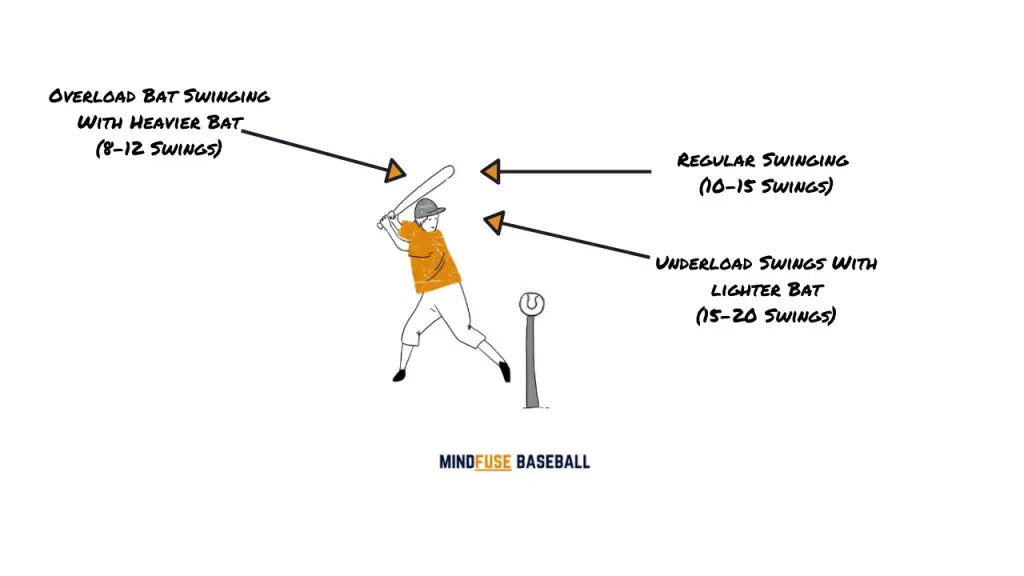
Bat speed is important when looking to increase batting power.
Essentially, the faster you swing a bat, and heavier that bat is – the further you’ll end up hitting the ball (considering everything else equal).
So ‘Swing The Load’ focuses on developing a faster swing with a heavier bat.
- Overload Bat Swings: 8-12 swings using a heavier bat.
- Regular Bat Swings: 10-15 swings using your regular weighted bat
- Underload Bat Swings: 15-20 swings with a lighter baseball bat.
Power Ball
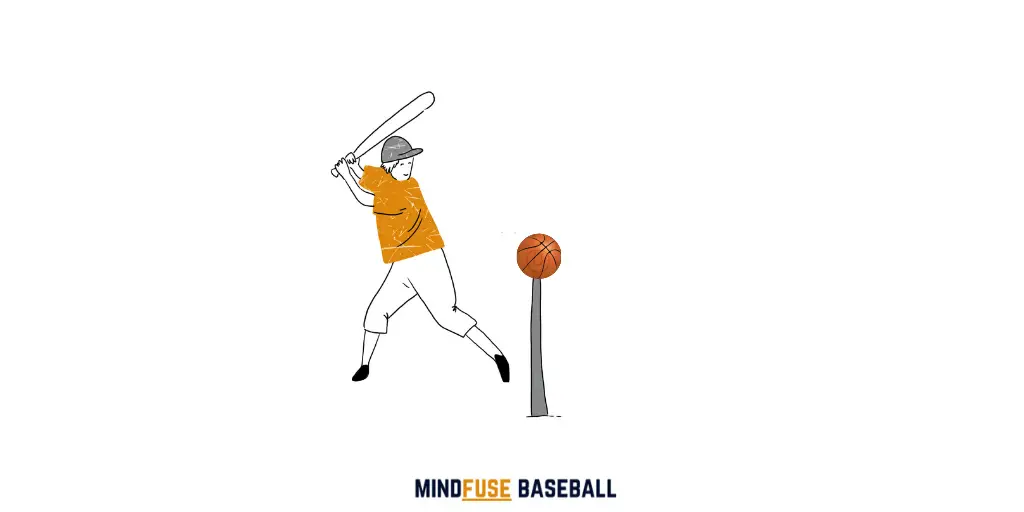
Power ball encourages batters to aim for power. By using a bigger ball (or weighted balls) you might find batters don’t follow through with their swing, so it’s important to coach the stride, load and swing aiming to hit the ball right up the middle.
Setup: Normal batting tee setup except this time use a larger ball. I.e a basketball or soccer ball.
Progressions: You could start with ‘kissing’ the ball as we went into detail above. Then move to striking the ball and finally onto replacing the larger ball with baseball.
One Handed Hit
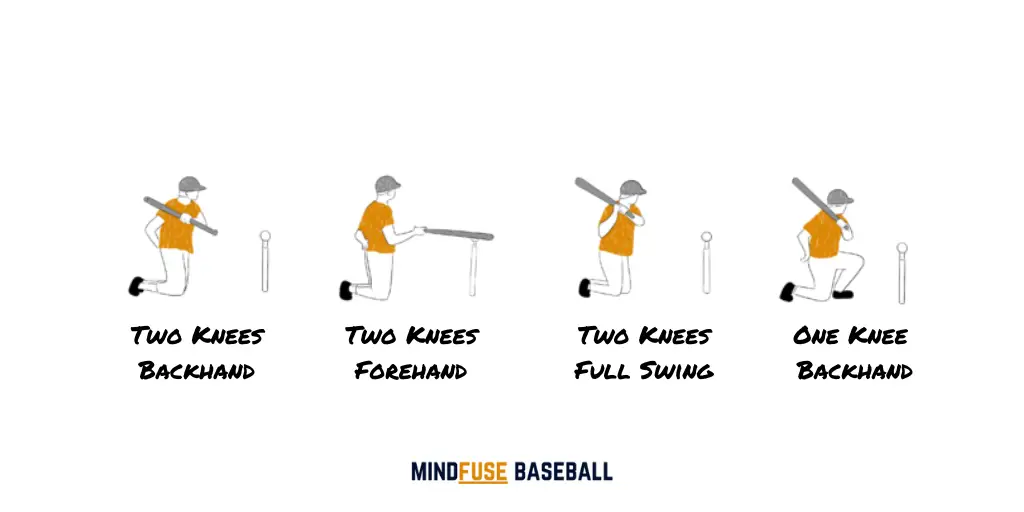
A variation of the normal baseball swing is to complete the swing but with one hand. By limiting the swing to just one hand you’ll be able to increase overall bat speed and control.
Setup: Setup as you normally would for a batting drill using a batting tee and ball. It might also be a good idea to use a hitting net too. Start the drill with the batter on their knees
Progressions:
- Start the batter on their knees using their front arm to hit the ball. Take their other arm out of the game by getting them to place it behind their back.
- Progression 2 is to focus on the swing using their back arm
- Progression 3 you’ll allow the batter to use both arms like they would in a normal swing but they are still kneeling down
- Finally, this drill is versatile in the fact it can be progressed and regressed many times. If kneeling on two knees isn’t enough – try to get your players to kneel on one knee instead.
To Keep Weight Back Or ‘Stay Back’
A common issue you’ll find, especially with younger players is their tendency to lunge themselves at the pitch.
With a desire to hit the ball, hit it as hard as they can and not get caught out – you’ll often find them wanting to almost throw themselves into the ball.
The problem with this however is they’re losing a lot of their body in the swing and therefore throwing the fundamentals right out the window.
So the question is – how do you set up a baseball hitting drill to ensure they keep their weight back?
Band Assisted Hitting
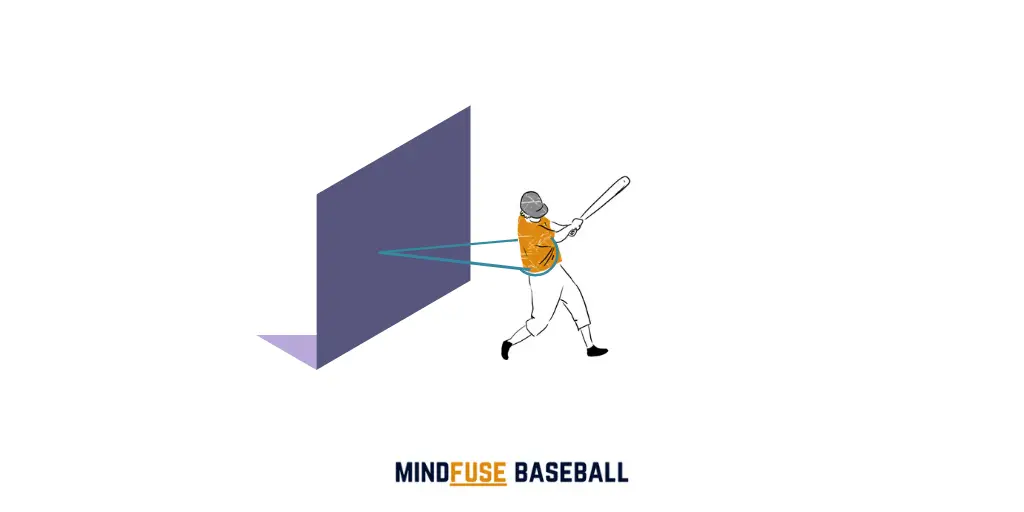
Using a band you can start to train your players to keep their weight back.
Setup: Set your batter up using an exercise band tied to a fence and wrapped around the waste of the batter. Now, when the batter takes their hit they’ll feel the pull back of the band.
Progression: Start with some dry swings before moving onto some ball work.
Swing - Reset - Swing
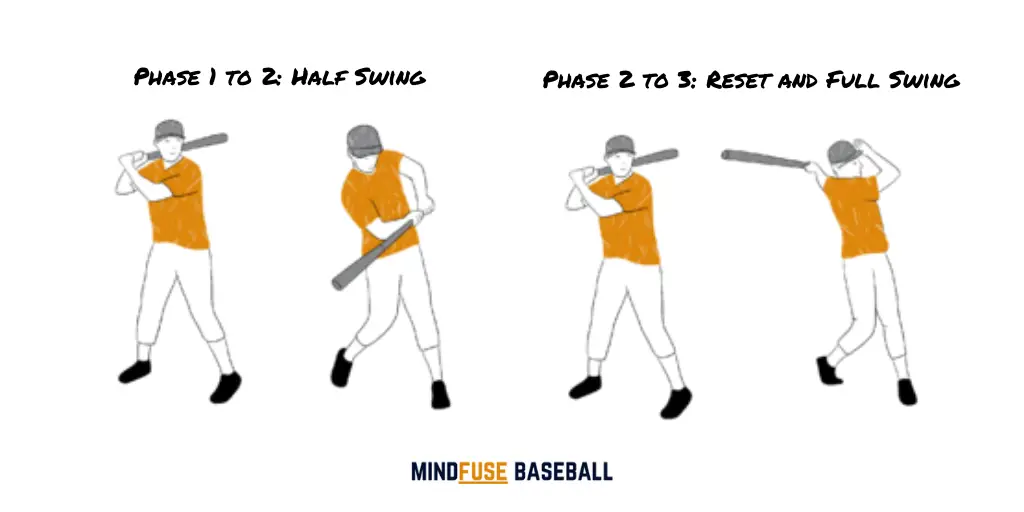
For this drill we’re going to break the swing into separate phases AKA: the Swing / Reset / Swing to help stop the lunging forward and keep the body back.
Setup: All you’ll need is a bat and you’re ready to go.
Details: Phase 1 (Half Swing): will be making the swing but stopping short of the follow through. Phase 2 (Reset): You’ll then reset the swing and start again with Phase 3 (Full Swing): completing the full swing.
Progression: Start with some dry swings before moving onto some ball work. This will be a lot easier to do with a batting tee when you do introduce a ball.
Weight Transfer Drill
![Baseball Drills for Kids: Kiss The Ball [MindfuseBaseball.com]](https://mindfusebaseball.com/wp-content/uploads/2020/04/Kiss-The-Ball-Baseball-Drill.png)
This drill is a great excuse to get the batting tee out and have some fun yet effective batting practice.
As you’ll see we’re emphasizing the load movement before the swing with a ‘high leg kick’.
While every hitter will set up differently this is a fantastic drill to ensure the hitter transfers their weight appropriately, keeping their body back without lunging forward.
To Keep Eye on The Ball
One issue you might come across with your younger batters is the tendency to move their head when they hit. This drill focuses on keeping their head still throughout the whole movement.
Hit What You See
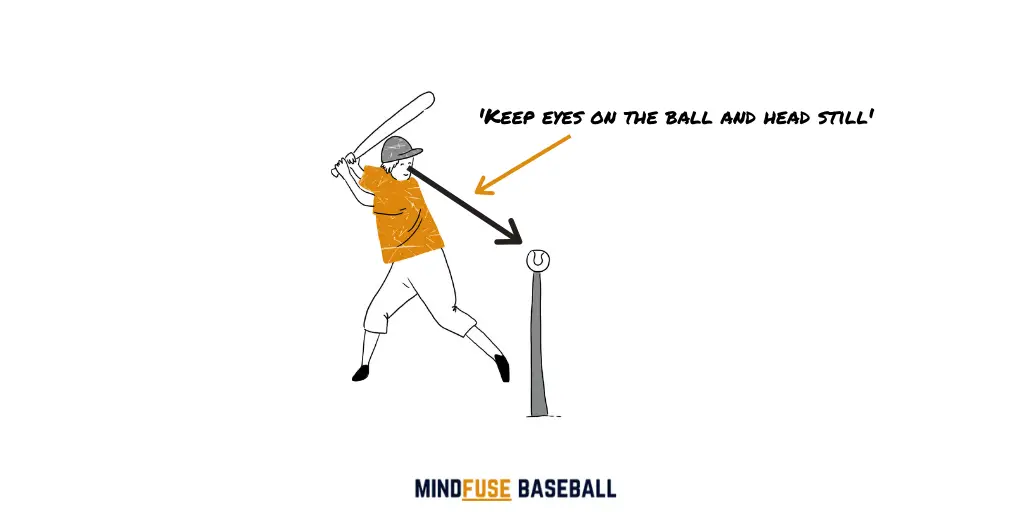
Setup: Setup as you normally would for a hitting drill. But instruct the batter to fix their eyes on the top of tee throughout the whole swing
Progressions: Starts with no ball then progress to using a ball. And as with most of these drills, Hit What You See can also be progressed into another hitting drill.
To Develop Hip Rotation
If you find yourself or your batters are more linear hitters and don’t tend to their hips as much as they should then a great drill to get those hips moving is the Bryce Harper Drill.
Bryce Harper Drill
Setup: Normal equipment setup. On the load you’re basically going to show the pitcher the bottom of your lead foot then, swing through and hit the ball.
Progressions: You can start without a ball, with a baseball and even use the Power Ball drill we went into before this drill.
Setup: Normal batting tee setup except this time use a larger ball. I.e a basketball or soccer ball.
Progressions: You could start with ‘kissing’ the ball as we went into detail above. Then move to striking the ball and finally onto replacing the larger ball with baseball.
Hitting Drills w/ Equipment & Training Aids
Hitting Drills Off Tee
While hitting drills off tee might be a little boring after a while – there’s a very good reason pro players and coaches use and highly recommend them – they are a great way to develop the finer aspects of hitting while adding a tremendous amount of consistency to practice.
Think of this way – if you wanted to work on your (or your players) batting skills, and opted for coach pitch or worse, peer pitch – you’ll be adding far more complexities to hitting development that you need too. This results in sub-par practice, with a huge amount of time wasted.
Hitting drills of tee bypass all the complexities, time wasting and confusion by making things super quick to get started, incredibly consistent and dependent. In short – incorporating a batting tee into your drills is an absolute no brainer. Here are some drills to get you started…
Kiss The Ball
![Baseball Drills for Kids: Kiss The Ball [MindfuseBaseball.com]](https://mindfusebaseball.com/wp-content/uploads/2020/04/Kiss-The-Ball-Baseball-Drill.png)
Ages: Kids
This drills is great for younger players as it gets them to focus on their swing more and therefore start to make more consistent hits off the ball. It’s a great way to build muscle memory and coordination skills.
Setup: The setup is simple. Start by setting up a batting tee with a ball on top. Give your player a bat and coach them to swing at the ball without hitting the ball.
Progressions: This sort of drill can be then progressed into almost any other hitting drill. For example you could progress ‘Kiss The Ball’ into ‘Hit What You See’ or go one further and focus on the ‘Stride Drill’.
Bucket Drop
![Baseball Drills for Kids: [MindfuseBaseball.com]](https://mindfusebaseball.com/wp-content/uploads/2020/04/Bucket-Drop-Baseball-Drill.png)
Bucket drop, while not quite a drill, is an important setup to encourage your players to drop the bat behind them after they make a hit – as opposed to just throwing the bat aimlessly.
Setup: Place a bucket or tire behind the batter and when they make the hit and run to first base the bat should land safely in the bucket or tire.
Progression: Again this ‘drill’ can and should be incorporated into other hittings drill in this guide.
Target Hit
![Baseball Drills for Kids: Target Hit [MindfuseBaseball.com]](https://mindfusebaseball.com/wp-content/uploads/2020/04/Baseball-Drills-for-Kids_-Target-Hit.png)
Ages: 7u+
Target hit is a drill game that uses different targets to hit as a way to help you or your players improve hitting accuracy.
Setup: Setup with a batting and ball and using at least 3 targets that mimic different areas on the field
Progression: You can change the position of the targets and even use a hitting net with targets.
Two Tee Swing Plane
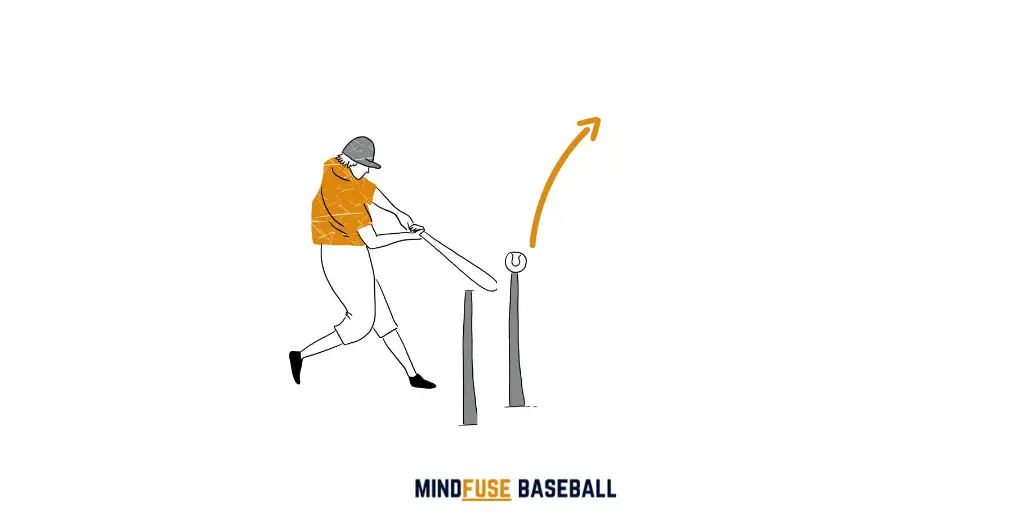
Two Tee Swing Plane uses an additional batting to help batters in understanding the swing plane. By using two tees, you can see if a player has a ‘loop’ in the middle part of their swing. The goal with this drill is to get the batter to consistently hit the ball on the first tee without hitting the additional tee set up behind.
Setup: To set up, place one tee in its normal position and then place an additional second tee behind the first one. Place the baseball on top of the first tee.
Progression: Use a combination of similar hitting drills in conjunction with this one to progress the drill. Just ensure to coach to use the correct coaching points.
Hitting Stride Drills
This drill is specifically designed to help you develop a better swing by analyzing the stride in 2 separate parts.
The Stride To Swing Drill
You’ve got the stride to pause part and the stride to swing. The Stride to Load Stride to Swing Drill starts at around 2:40 in the video.
Setup: Setup normal batting tee setup. Use a baseball hitting net if you haven’t got much space to play with. For the first part you don’t want the feet to be too far open but rather ever so slightly closed. For the first part the batter will stride then pause and then return back to the normal position. For the second part they’ll repeat the stride but on return back to the normal stance they’ll then stride to take a swing at the ball.
Progression: Start without a ball then progress to using a ball. This is another drill that of course can use the Power Ball set up from above.
Hitting Net Drills
Baseball hitting net drills still use the aid of a batting tee, but instead of hitting further out into the field, a batting tee can have you practicing for power, accuracy all whilst training in the minimal amount of space needed.
Hitting nets are pretty inexpensive these days, although you will want to make sure you get a high-quality durable one that’s good value for money. (You can use this guide here to help you)
While I’ve only highlighted 2-3 drill setups you can use below, you’ll find you can pair a lot of the drills in this guide with a hitting net whenever needed.
For example, batting drills to help you increase bat speed and power would work brilliantly with or without a hitting net.
Hitting H.O.R.S.E
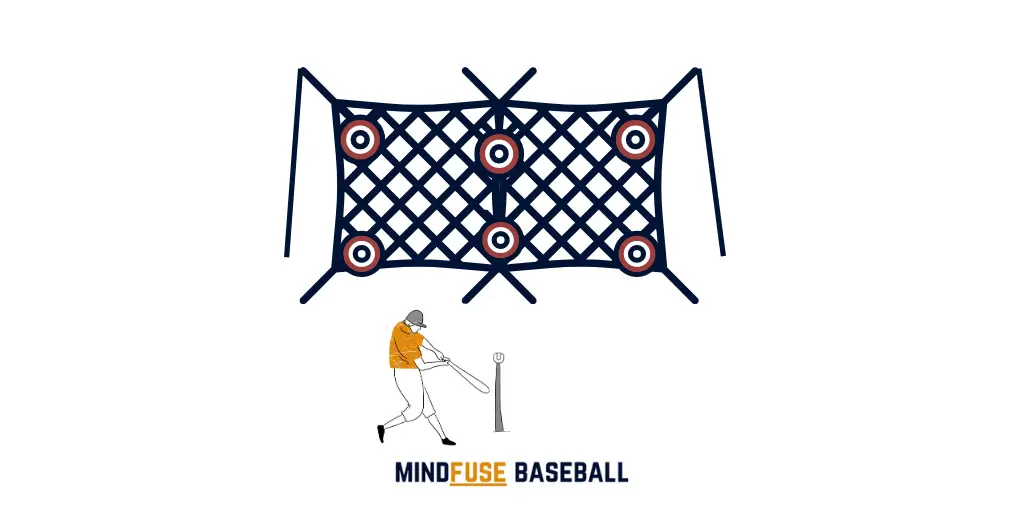
Hitting H.O.R.S.E focuses on getting batters to hit specific locations setup within a target. The H.O.R.S.E concept is played among a lot of other sports including; basketball and soccer.
Setup: You’ll likely need a hitting net or at least a big enough cage or fence where you place your targets. Have your batter take up a normal position with a batting tee. The batter will call out the target he is aiming for. If they hit the target the next batter must hit the same target.
If the first batter doesn’t hit the target, the second batter comes up and chooses a target.
If the following batter misses the target chosen by the previous batter, that batter gets a ‘H’. Everytime a batter misses a target set by the previous player they pick up a letter. If a player picks up all letters in the H.O.R.S.E they are out of the game.
Quick Hands Drill
Setup: You’ll need two players (or coach and player). With one player ready for the throw with bat in hand and the other player feeding the ball through the hitters front hip. NOT the plate.
The hitter must react to the ball and have his hands beat the ball to the spot.
While you can practice this drill outside in an open field – I’d recommend using a hitting or hitting ‘wall’ (as shown in the video) for time and training efficiency.
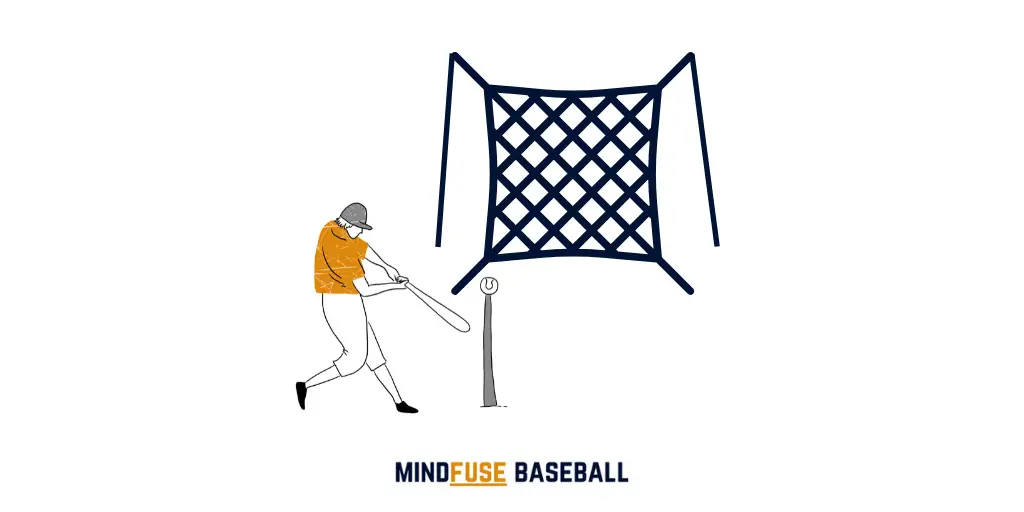
The truth is, with just one hitting net, you’ve got a whole wide range of different drills you can get cracking with.
You can practice alone for hours without collecting balls and as you’ve seen above you can attach targets to the net and work on your accuracy.
Fun Baseball Drills
No matter what baseball drill you’re doing there should always be some sort of fun. However, for younger players keeping them engaged and interested for a long period of time can be difficult.
That’s why all of your practices should have some sort of game and fun tied to them.
But don’t underestimate the power of fun in older players and even adults – afterall, nobody wants to do anything ‘boring’. Again, some of these drills are also tied in with our batting tee and hitting net categories above – but as they had a focus on FUN, I’ve decided to add them into the ‘Fun Baseball Drills’ section.
Here are some fun baseball drills that can be done at your next practice…
Double Trouble
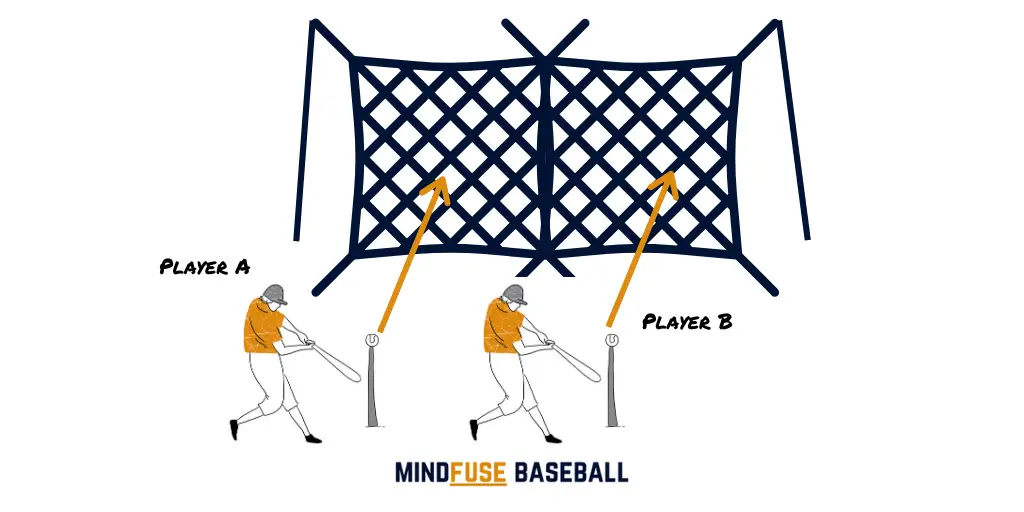
Double Trouble pits two players off against each other with the winner hitting the back net first.
Setup: Setup two batting tees and have each player enough distance away from each other. Have a third person (coach or player) shout a trigger word (i.e: ‘HIT!). On the trigger word both batters react as fast as they can, swing and try to hit the back net first.
Hitting Chain
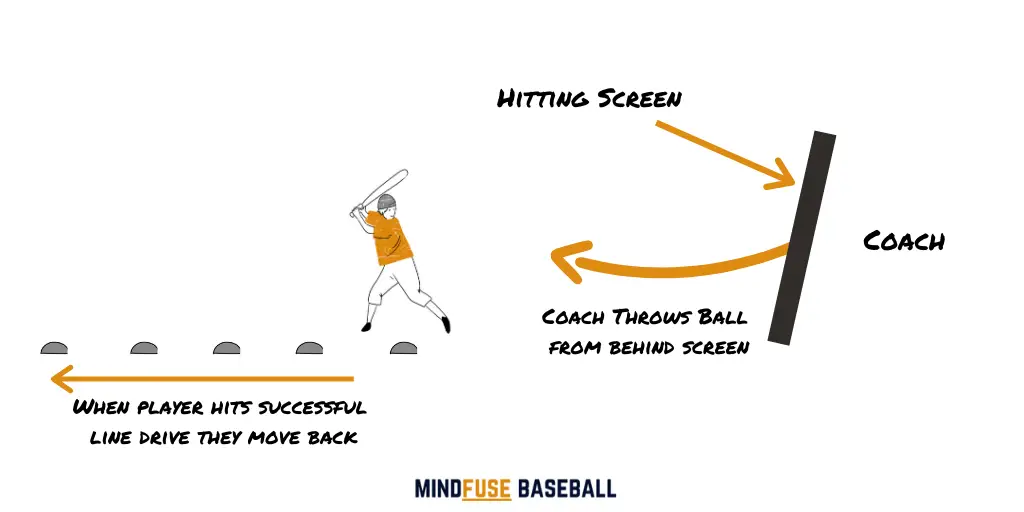
Hitting Chain is a really good hitting game to focus young players as they’ll not want to lose their streak. This drill works on developing timing while increasing or decreasing the distance at which the ball is hit. As the distance increases hitting mistakes will become easier to spot.
Setup: Setup 3-5 markers or cones – each one at a different distance from the coach / screen. Have another player or coach feed the balls to the batter. The batter starts at the closest marker or cone to the coach/player/screen. On hitting a clean line drive they’ll move back to the next marker. If they don’t hit a clean shot then have to move back closer to the feeder again.
Progressions: Change the speed of the ball. You can also change the pitch type and location. Batters can also be asked to hit the ball at a certain target as well.
Beat The Goalie
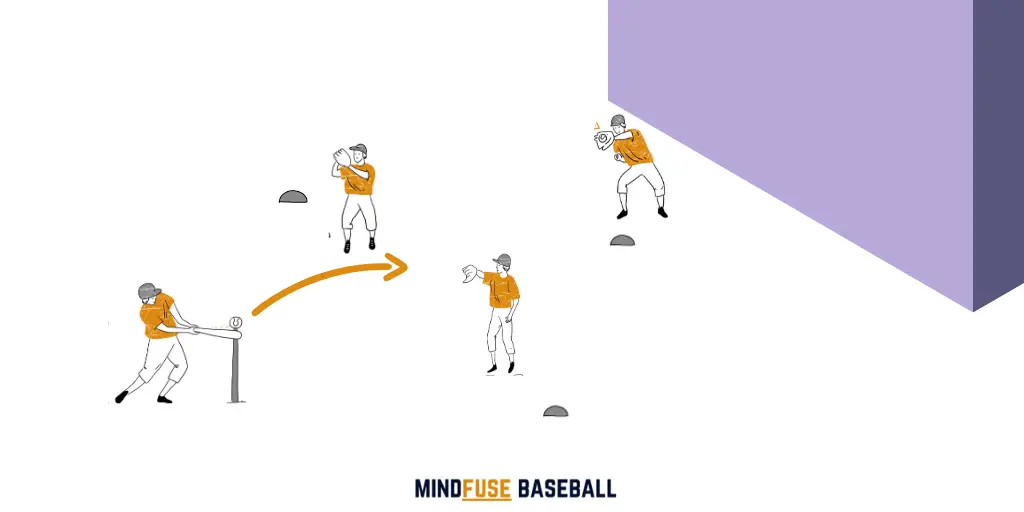
Beat The Goalie is a great drill to get more than 1 or 2 players involved at the same time. While it focuses on the hitting skills of the batter it can also be used to improve the fielding skills of players too.
Setup: You’ll need to make sure you have enough space – which will depend on the ability of your players. Have your batters line up behind each other. On the opposite side place 3 fielders – 2 fielders at the first ‘goal’ and 1 fielder at the second ‘goal’ located behind the first.
The batter must hit the ball past both sets of goalies. If they get the ball past the first line of defense they score 1 point. If they manage to get the ball past the 2nd line of defense they score 2 points. Each batter has 6 turns before switching with another batter and will add up their scores.
Using a Tire For Your Hitting Drills
Using a tire for your hitting drills and be a great, really Inexpensive way to develop batting skills.
As you’ll see from the two drill setups below – a simple car tire can be used in multiple ways to add more dimension to your training.
Both of these drills can help develop batting power and timing – two categories we went into detail above.
Hit For Impact Tire Drill
Why This Drill? To help improve batting speed, power, and impact upon contact with ball.
Details: By setting up a large rod that works it way through the tire, you develop both contact accuracy, timing, rhythm and power.
Progressions & Regressions: Start with a stationary tire then progress to a rotating tire.
Tire Progression Drills
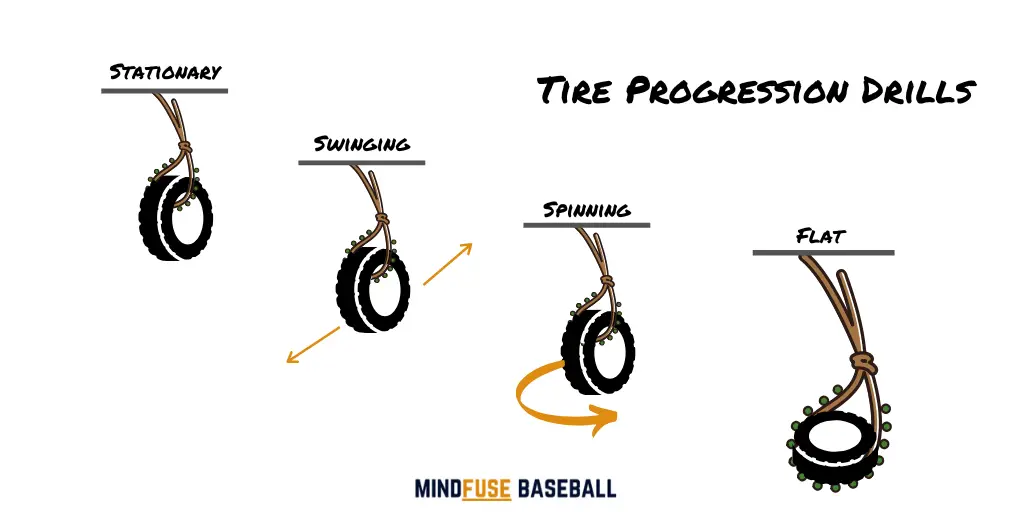
These drills require less setup. You’ll just need an old tire and somewhere to suspend it. Get a bat in hand and you’re ready to go.
Stationary: Start with hitting the tire square.
Swinging: For this variation, have another person put a slight swing on the tire. This will mean the batter will need to time their swings properly to hit the tire properly.
Spinning: Another variation to work on the batters timing.
Level: This not only reduces the area of focus to a smaller area but also allows the batters to develop on leveling their swing out too.
Sled Drill
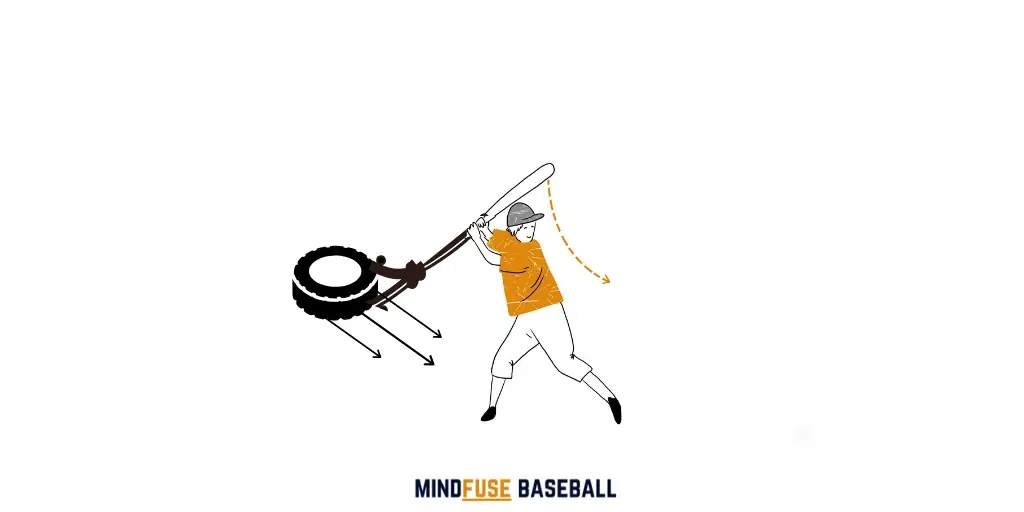
The Sled Drill is a great way to put some resistance and fun back into the old dry swing. It requires you pull a sled of some sort that’s tied to the bat.
When the batter makes the dry swing they’ll feel the resistance on the bat.
Setup: Attach a rope and something heavy (eg. tire) to just above your hands on the bat. Now perform the dry swings while the tire is attached.
Indoor Baseball Hitting Drills (+Backyard)
Indoor baseball hitting drills for home and backyard drills really all depends on two factors:
- How much space you have
- What equipment you have available
Of course, even without traditional equipment you’ve bought from Amazon for example, you can also get a bit DIY and build your own baseball equipment.
As a general rule of thumb I would recommend at least having a batting tee and a hitting net to hit into. The batting tee will reduce the amount of throwing involved and the batting net will reduce the space you need to a couple of yards.
With those 2 pieces of additional equipment you’re pretty much good to go with most of the drills listed in this guide.
Of course you could also use the tire drills at home too and depending on the size of your backyard you may be able to do some of the bigger drills.
Aside from these two drills below, space permitting – you can also use many of the net and tee drills I covered in the first section.
The Mirror Hitting Drill
For those that are pretty much confined to indoors here’s a really creative video you should check out….
No Equipment Drills
Why These Drills? While you won’t want to be concentrating your entire training routine around dry swings – there are times where having a few no-equipment hitting drills can come in handy…
